A perfectly golden, crispy waffle is a morning delight, but a sticky, greasy waffle maker exterior can quickly dampen the joy of cooking. Over time, spills, splatters, and even airborne grease can accumulate, transforming your once sleek appliance into an unpleasant, grimy mess. This isn’t just an aesthetic problem; excessive oil buildup can affect your waffle maker’s performance, make it challenging to handle, and even attract dust and debris. As an experienced technician who has seen countless waffle makers, from home models to professional cafe equipment, I understand the frustration. This guide will walk you through proven methods to thoroughly clean oil buildup from your waffle maker’s exterior housing, restoring its shine and ensuring years of delicious, hassle-free breakfasts.
Why Your Waffle Maker Gets Greasy: Understanding Oil Accumulation
You might wonder how your waffle maker, primarily used for batter, ends up with such stubborn oil and grease on its outside. The truth is, several factors contribute to this persistent problem. Understanding these causes is the first step toward effective cleaning and prevention.
Common Causes of Exterior Oil Accumulation
|
Our Picks for the Best Waffle maker in 2026
As an Amazon Associate I earn from qualifying purchases.
|
||
| Num | Product | Action |
|---|---|---|
| 1 | Cuisinart Waffle Maker, 1250W Round Classic Waffle Iron, 5-Setting Adjustable Browning Control, WMR-CANAS, Brushed Stainless |

|
| 2 | Waffle Maker, Rotating Belgian Waffle Maker, 180° Flip Waffle Iron, Non-Stick Plate, Adjustable Browning Control, Foldable Cool Touch Handle, Removable Drip Tray, Space Saving Storage, Stainless Steel |
|
| 3 | OSTBA Waffle Maker, 2 Slice Non-Stick Waffle Iron, Belgian Waffle Machine with Indicator Lights, PFOA Free, Perfect for Breakfast and Snacks, 750W |
|
| 4 | Cuisinart Waffle Maker, 1250W Round Classic Waffle Iron, 5-Setting Adjustable Browning Control, WMR-CAP2, Brushed Stainless |
|
| 5 | Elite Gourmet EWM015MX Electric Nonstick 4.5-inch Mini Waffle Maker, Belgian Waffles, Compact Design, Hash Browns, Keto, Snacks, Sandwich, Eggs, Easy to Clean, Mint |
|
| 6 | bella Classic Rotating Belgian Waffle Maker with Nonstick Plates, Removable Drip Tray, Adjustable Browning Control and Cool Touch Handles, Black |
|
| 7 | Dash Mini Waffle Maker- Compact Electric Iron for Creative Homemade Treats - Nonstick Surface - Easy-to-Clean - Perfect for Kids & Families - Aqua |
|
| 8 | Cuisinart Round Flip Belgian Waffle Maker, Black/Silver, 1 inch thick, WAF-F30NAS |
|
| 9 | Dash No-Drip Waffle Maker - Quad Waffle Maker for Hassle-Free Breakfasts - Dual Nonstick Heating Plates & Quick Heat-Up System - Easy-Release Surface - Silver |
|
| 10 | KRUPS 4-Slice Belgian Waffle Maker: Stainless Steel, 5 Browning Levels, Audible Ready Beep, Removable Plates, 1200W, Silver/Black, Large Waffle Maker Family Size, Great for Family Breakfasts |
|
The most frequent culprit is often overlooked: overspray from cooking oils or non-stick sprays. While convenient, these sprays can drift beyond the cooking plates, settling on the housing where they bake on with each use. Similarly, excess batter can overflow during cooking, particularly if the plates are overfilled or the batter is too thin. This batter, often rich in oil, transforms into a sticky, hardened residue on the exterior as it heats. Furthermore, splatters and drips from oil, butter, or even melted cheese can escape the cooking surface, adhering to the outer shell. Over time, these seemingly minor incidents compound, creating layers of polymerized oil that become incredibly difficult to remove without proper technique.
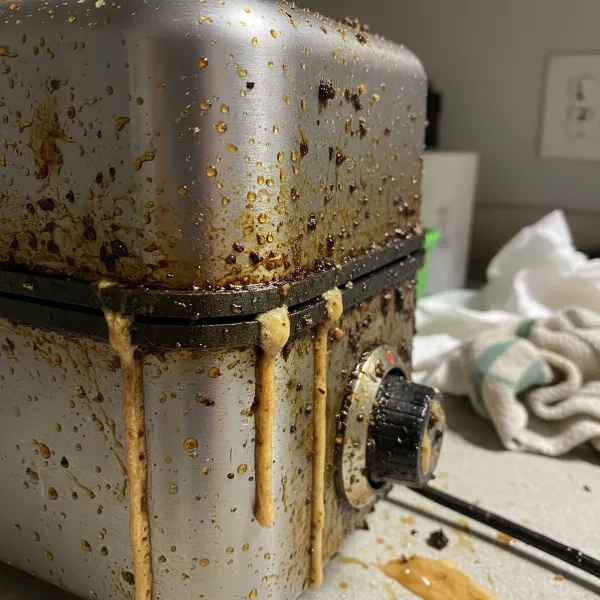 Close-up of a waffle maker's exterior showing significant baked-on grease and batter overflow.
The Importance of Regular Exterior Cleaning
Beyond aesthetics, keeping your waffle maker’s exterior clean is vital for several reasons. First, accumulated grease can become unsanitary, attracting dust, crumbs, and even pests. Second, a sticky surface is unpleasant to handle, making the appliance less enjoyable to use. Third, prolonged exposure to baked-on oil can potentially lead to discoloration or damage to the housing material, particularly on plastic components. Lastly, a well-maintained appliance often performs better and lasts longer. Regular cleaning not only preserves its appearance but also prevents residue from interfering with vents or moving parts, ensuring your waffle maker operates efficiently for many years to come.
Essential Tools and Cleaning Agents for Oil Buildup
Before you dive into cleaning, gathering the right tools and cleaning agents is crucial. Using the correct supplies will make the job much easier and ensure you don’t damage your appliance. Remember, a little preparation goes a long way in restoring your waffle maker to its pristine condition.
What You’ll Need: A Checklist
Having these items on hand will equip you for any level of oil buildup:
- Mild Dish Soap: A grease-cutting formula is ideal.
- Microfiber Cloths or Soft Sponges: Gentle yet effective for wiping and scrubbing.
- Baking Soda: A natural abrasive and odor absorber, excellent for pastes.
- White Vinegar: An acidic cleaner that helps cut through grease and grime.
- Rubbing Alcohol (Isopropyl Alcohol 90%): A powerful solvent for dissolving tough grease, especially good for stainless steel.
- Old Toothbrush or Small, Soft-Bristled Brush: Perfect for reaching into tight crevices and textured surfaces.
- Cotton Swabs: Essential for delicate areas and tiny gaps.
- Warm Water: For mixing solutions and rinsing.
- Paper Towels: For initial wiping and drying.
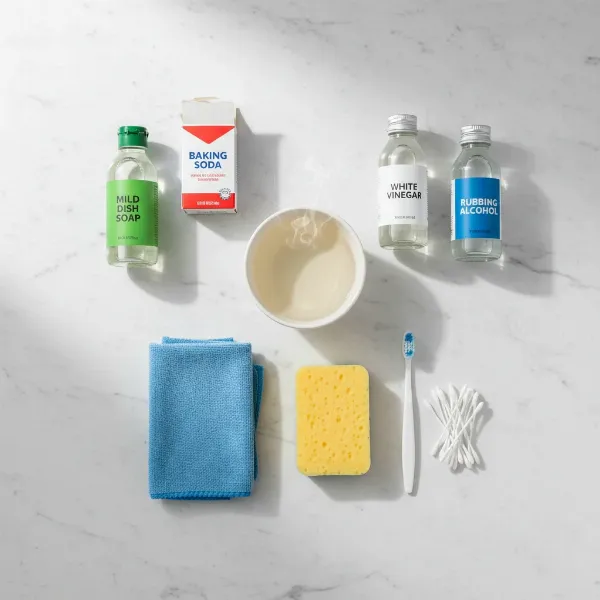 Assortment of cleaning supplies including dish soap, baking soda, vinegar, and cloths for waffle maker maintenance.
Safety First: Precautions Before You Start
Safety should always be your top priority when cleaning any electrical appliance. Failing to take proper precautions can lead to injury or damage to your waffle maker.
- Unplug the Appliance: This is non-negotiable. Always ensure your waffle maker is completely disconnected from the power source to prevent electric shock.
- Allow it to Cool Completely: Hot surfaces can cause burns and can also damage cleaning tools or melt certain materials. Wait until the appliance is cool to the touch.
- Avoid Abrasive Cleaners and Scourers: Steel wool, harsh scrubbing pads, or abrasive chemical cleaners can scratch, corrode, or strip the finish from your waffle maker’s housing. Stick to soft materials.
- Never Submerge the Unit: Unless your waffle maker explicitly states it is submersible (which most electric models are not), never run it under water or immerse it in a sink. Water can damage internal electrical components.
- Check Your Owner’s Manual: Always refer to your specific waffle maker’s manual for any brand-specific cleaning instructions or warnings.
Step-by-Step Guide: How to Effectively Clean Oil Buildup
Once you’ve gathered your supplies and prioritized safety, it’s time to tackle that stubborn oil buildup. Follow these steps for a thorough and effective cleaning process, from initial wipe-down to the final polish.
Initial Wipe-Down and Loosening Grime
Start by removing any loose debris and absorbing excess oil. Begin with the waffle maker completely cool and unplugged. Use a dry paper towel to wipe away any crumbs, dry batter bits, or easily accessible oil. For lightly sticky areas, a dry paper towel can often absorb a surprising amount of grease. If you encounter baked-on batter or very thick oil, try dabbing a few drops of cooking oil onto these spots. Let it sit for a few minutes; the fresh oil can help re-emulsify and loosen the old, hardened grime, making it easier to wipe away with a damp cloth afterward. This initial pass prepares the surface for deeper cleaning.
Tackling Stubborn Grease with Soap and Water
For the majority of oil buildup, a simple yet powerful solution of dish soap and warm water is your best friend. In a bowl, mix warm water with a few drops of mild, grease-cutting dish soap until suds form. Dip a soft sponge or a microfiber cloth into the soapy water, wring it out thoroughly until it’s just damp (not dripping), and begin wiping down the exterior housing. Focus on areas with visible grease and grime, applying gentle pressure. For textured surfaces or around control knobs, an old toothbrush dipped in the solution can work wonders, allowing you to scrub without scratching. Once you’ve cleaned the greasy areas, use a separate, clean damp cloth (rinsed with plain water) to wipe away any soapy residue, then dry immediately with a clean microfiber cloth to prevent water spots.
Advanced Techniques for Baked-On Oil
When dish soap alone isn’t enough, it’s time to bring in the heavy hitters. These techniques are designed for deeply embedded or polymerized oil.
- Baking Soda Paste: For tough, baked-on grease, a baking soda paste is remarkably effective. Mix baking soda with a small amount of water (or even hydrogen peroxide for extra bubbling power, as some suggest) to create a thick paste. Apply this paste directly to the stubborn oil buildup on the exterior, ensuring not to get it into any electrical openings. Let the paste sit for at least 30 minutes, or even up to an hour, allowing it to penetrate and absorb the oil. As the paste dries and absorbs the grease, it may turn brownish. After letting it sit, gently scrub the area with a damp microfiber cloth or a soft brush, then wipe clean with a fresh damp cloth and dry thoroughly.
- Vinegar Solution: White vinegar is a natural degreaser. For light to moderate oil film, you can dampen a cloth with undiluted white vinegar and wipe down the exterior. For more intense buildup, mix equal parts white vinegar and water in a spray bottle, lightly mist the affected area, let it sit for a few minutes, then wipe clean. Remember to dry thoroughly to avoid vinegar streaks and a lingering odor.
- Rubbing Alcohol (Isopropyl Alcohol): For very sticky or greasy residues, especially on metal or plastic housings, 90% isopropyl alcohol acts as an excellent solvent. Dampen a cotton ball or a corner of a microfiber cloth with rubbing alcohol and gently wipe the affected areas. The alcohol quickly evaporates, taking the dissolved grease with it. This is particularly effective on stainless steel finishes, leaving them streak-free. Always test in an inconspicuous area first to ensure it doesn’t affect the finish.
Cleaning Nooks, Crannies, and Control Panels
The small details often make the biggest difference in a truly clean appliance. Don’t forget the hidden spots where grease loves to hide.
- Crevices and Seams: Use a toothpick or a cotton swab dipped in your chosen cleaning solution (soapy water, vinegar, or alcohol) to carefully dislodge grime from seams, hinges, and narrow gaps around the cooking plates.
- Control Panels and Buttons: These areas require extra care due to electrical components. Lightly dampen a cotton swab or a very slightly damp cloth with dish soap solution or rubbing alcohol. Gently wipe around buttons and dials, ensuring no liquid drips into the controls. Follow up with a dry cotton swab or cloth to remove any moisture.
Polishing and Finishing Touches
Once all the grime is gone, a final polish can make your waffle maker look brand new.
- Stainless Steel: For stainless steel exteriors, after cleaning, use a clean, dry microfiber cloth to buff the surface. For an extra shine, a specialized stainless steel cleaner or a light wipe with a cloth dampened with a tiny amount of mineral oil can help, buffing along the grain.
- Plastic/Other Materials: For plastic or painted surfaces, a final wipe with a clean, dry microfiber cloth is usually sufficient to bring out a clean, streak-free finish.
“Many people overlook the exterior, but it’s often the hardest part to clean due to baked-on residue. Patience and the right tools—especially a good grease-cutting soap and a little baking soda paste—are your best allies.” – Admin, wafflemakerguide.com
Preventing Future Oil Buildup: Best Practices
Prevention is always easier than a deep clean. By adopting a few simple habits, you can significantly reduce the amount of oil buildup on your waffle maker’s exterior and keep it looking its best with minimal effort.
Wiping After Every Use
The single most effective preventative measure is a quick wipe-down immediately after each use. Once your waffle maker has cooled down but before any residue has a chance to fully harden, use a damp cloth with a tiny bit of dish soap to quickly wipe the exterior. This removes any fresh splatters or drips before they become stubborn, baked-on stains. This habit takes mere seconds but saves you hours of scrubbing in the long run.
Proper Batter Pouring Techniques
Avoiding overfilling the waffle maker is key to preventing overflow that leads to exterior grime. Learn the optimal amount of batter for your specific model – it usually takes some practice. Pour the batter carefully into the center of the bottom plate, allowing it to spread naturally. A ladle or a measuring cup with a spout can help control the pour and minimize drips.
Using Drip Trays (if applicable)
Some waffle maker models come with built-in drip trays or channels designed to catch excess batter and oil. If your model has this feature, make sure to utilize it and clean the tray regularly. For models without a drip tray, consider placing a sheet of aluminum foil or parchment paper underneath the waffle maker during use to catch any potential drips.
Regular Deep Cleans
Even with diligent daily wiping, a thorough deep clean of the exterior every few months, depending on usage frequency, is advisable. This ensures that any microscopic oil film or hidden grime is addressed before it becomes a major problem. Incorporating the advanced cleaning techniques mentioned earlier into this routine will help maintain your waffle maker’s pristine condition and extend its lifespan.
Conclusion
A clean waffle maker is a happy waffle maker, and mastering the art of removing oil buildup from its exterior housing is essential for both its longevity and your culinary enjoyment. By following this comprehensive guide, from understanding the causes of grease accumulation to employing the right tools and techniques, you can effectively tackle even the most stubborn grime. Remember to prioritize safety by unplugging your appliance and letting it cool, and choose gentle yet effective cleaning agents like mild dish soap, baking soda, white vinegar, or rubbing alcohol. More importantly, embrace preventative measures like immediate wipe-downs and proper pouring techniques to keep your appliance looking and performing its best. With these strategies, you’re not just cleaning a device; you’re preserving a tool that brings joy to your kitchen. What are your favorite tips for keeping your waffle maker spotless?
Frequently Asked Questions
Can I use oven cleaner to remove baked-on oil from my waffle maker’s exterior?
No, it is strongly advised against using oven cleaner on a waffle maker’s exterior. Oven cleaners contain harsh chemicals that can damage the finish, corrode materials, or leave behind toxic residues that are unsafe for a food-contact appliance. Stick to milder, household-safe degreasers like dish soap, baking soda, or isopropyl alcohol.
How often should I deep clean the exterior housing of my waffle maker?
For optimal maintenance, aim for a quick wipe-down after every use. A more thorough deep clean, addressing any accumulating oil buildup with methods like baking soda paste or rubbing alcohol, should be performed every 1-3 months, depending on how frequently you use your waffle maker.
What if the oil buildup is very old and hard, almost like varnish?
For extremely old and hardened oil buildup, a baking soda paste left to sit for a longer period (up to an hour or more) can be effective. Alternatively, repeatedly applying a cloth dampened with 90% isopropyl alcohol or even a few drops of fresh cooking oil to soften the old oil before wiping may help. Patience and multiple applications might be necessary.
Will non-stick cooking spray contribute to exterior oil buildup?
Yes, non-stick cooking sprays are a common contributor to exterior oil buildup. The fine mist can easily overspray onto the housing, and over time, these oils polymerize and become sticky, baked-on residue. Using a pastry brush to apply a small amount of liquid oil or butter directly to the plates is a better alternative to avoid this.
Can I use steel wool or abrasive scrubbers on the exterior?
No, never use steel wool or abrasive scrubbers on your waffle maker’s exterior. These materials can scratch, dull, or permanently damage the finish, whether it’s plastic, painted metal, or stainless steel. Always opt for soft cloths, sponges, or a soft-bristled brush to protect your appliance’s appearance.