Have you ever craved a breakfast that transcends the ordinary, combining the familiar comfort of a waffle with an exciting, unique texture? Enter the mochi waffle, affectionately known as a “moffle.” These delightful treats offer an unparalleled culinary experience: a remarkably crispy exterior that gives way to a gloriously soft, chewy, and slightly elastic interior. Whether you’re a seasoned baker or a curious beginner, mastering mochi waffles at home is an achievable and rewarding endeavor that will undoubtedly elevate your breakfast or dessert game. This comprehensive guide will walk you through the world of moffles, from understanding their unique characteristics to crafting them with various methods, ensuring you can whip up these irresistible Japanese-inspired delights anytime.
What Are Mochi Waffles (Moffles)?
Mochi waffles, or moffles, are an innovative fusion that marries the traditional Belgian waffle with Japanese mochi. Mochi is a staple Japanese rice cake made from mochigome (short-grain glutinous rice) that has been pounded into a paste and molded. When this unique rice flour or prepared mochi is cooked in a waffle iron, magic happens. The result is a waffle that stands apart from its traditional counterparts, boasting a signature texture: delightfully crisp on the outside, akin to a perfectly toasted cracker, while maintaining an incredibly soft, chewy, and slightly bouncy interior. This satisfying contrast is what makes moffles so captivating and addictive, offering a delightful departure from the standard fluffy or dense waffle.
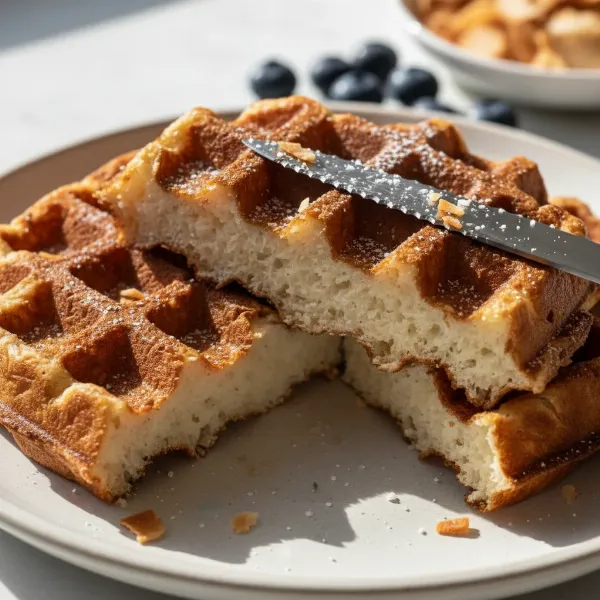 A mochi waffle showcasing its crispy golden-brown exterior and delightfully chewy, soft interior.
Essential Ingredients for Perfect Moffles
The secret to a successful mochi waffle lies primarily in one key ingredient: glutinous rice flour, commonly known as mochiko. This special flour, not to be confused with regular rice flour, is what gives mochi waffles their characteristic chewy texture.
- Mochiko (Sweet Glutinous Rice Flour): This is non-negotiable for authentic mochi waffles. It’s naturally gluten-free and can be found in Asian markets or the international aisle of many grocery stores.
- Sweetener: Granulated sugar is typically used to balance the flavors and aid in browning.
- Liquid: Milk (dairy or non-dairy), water, or a combination are used to create the batter.
- Leavening Agents (Optional but Recommended): Baking powder and sometimes baking soda help achieve a lighter texture and some lift, although the chewiness remains dominant.
- Fats: Vegetable oil, melted butter, or coconut oil add richness and contribute to the crispy crust.
- Eggs: Often included for binding and structure, contributing to a slightly richer taste.
- Flavorings: Vanilla extract is a common addition, but you can experiment with matcha powder, ube extract, or citrus zest for exciting variations.
Choosing Your Mochi Waffle Method
There are several pathways to crafting delicious mochi waffles, ranging from a simple batter to utilizing pre-made mochi. Each method offers a slightly different experience, catering to various preferences and time constraints.
Method 1: Simple Batter from Scratch
This is a popular and straightforward approach, ideal for those who want to prepare mochi waffles entirely from basic ingredients. The process is similar to making regular waffles, with mochiko replacing or complementing traditional wheat flour.
Ingredients (Example Recipe):
- 1 ½ cups mochiko (sweet glutinous rice flour)
- ¼ cup granulated sugar
- 1 teaspoon baking powder
- ½ teaspoon salt
- 1 large egg
- 1 cup milk (or non-dairy alternative)
- ¼ cup vegetable oil or melted butter
- 1 teaspoon vanilla extract
|
Our Picks for the Best Waffle maker in 2026
As an Amazon Associate I earn from qualifying purchases.
|
||
| Num | Product | Action |
|---|---|---|
| 1 | Cuisinart Waffle Maker, 1250W Round Classic Waffle Iron, 5-Setting Adjustable Browning Control, WMR-CAP2, Brushed Stainless |

|
| 2 | Dash No-Drip Waffle Maker - Quad Waffle Maker for Hassle-Free Breakfasts - Dual Nonstick Heating Plates & Quick Heat-Up System - Easy-Release Surface - Silver |
|
| 3 | Waffle Maker, Rotating Belgian Waffle Maker, 180° Flip Waffle Iron, Non-Stick Plate, Adjustable Browning Control, Foldable Cool Touch Handle, Removable Drip Tray, Space Saving Storage, Stainless Steel |
|
| 4 | Elite Gourmet EWM015MX Electric Nonstick 4.5-inch Mini Waffle Maker, Belgian Waffles, Compact Design, Hash Browns, Keto, Snacks, Sandwich, Eggs, Easy to Clean, Mint |
|
| 5 | Cuisinart Waffle Maker, 1250W Round Classic Waffle Iron, 5-Setting Adjustable Browning Control, WMR-CANAS, Brushed Stainless |
|
| 6 | OSTBA Waffle Maker, 2 Slice Non-Stick Waffle Iron, Belgian Waffle Machine with Indicator Lights, PFOA Free, Perfect for Breakfast and Snacks, 750W |
|
| 7 | KRUPS 4-Slice Belgian Waffle Maker: Stainless Steel, 5 Browning Levels, Audible Ready Beep, Removable Plates, 1200W, Silver/Black, Large Waffle Maker Family Size, Great for Family Breakfasts |
|
| 8 | Dash Mini Waffle Maker- Compact Electric Iron for Creative Homemade Treats - Nonstick Surface - Easy-to-Clean - Perfect for Kids & Families - Aqua |
|
| 9 | bella Classic Rotating Belgian Waffle Maker with Nonstick Plates, Removable Drip Tray, Adjustable Browning Control and Cool Touch Handles, Black |
|
| 10 | Cuisinart Round Flip Belgian Waffle Maker, Black/Silver, 1 inch thick, WAF-F30NAS |
|
Instructions:
- Preheat Your Waffle Iron: Ensure it’s hot and lightly greased.
- Combine Dry Ingredients: In a large bowl, whisk together the mochiko, sugar, baking powder, and salt.
- Combine Wet Ingredients: In a separate bowl, whisk together the egg, milk, oil, and vanilla extract.
- Mix Batter: Pour the wet ingredients into the dry ingredients and whisk until just combined. Be careful not to overmix; a few lumps are fine. The batter will be thicker than traditional waffle batter.
- Cook Waffles: Pour about ½ cup of batter onto the hot waffle iron, spreading it slightly if needed. Cook for 3-5 minutes, or until golden brown and crispy. The cooking time might be slightly longer than regular waffles to ensure a fully crispy exterior and cooked interior.
- Serve: Remove from the waffle iron and serve immediately.
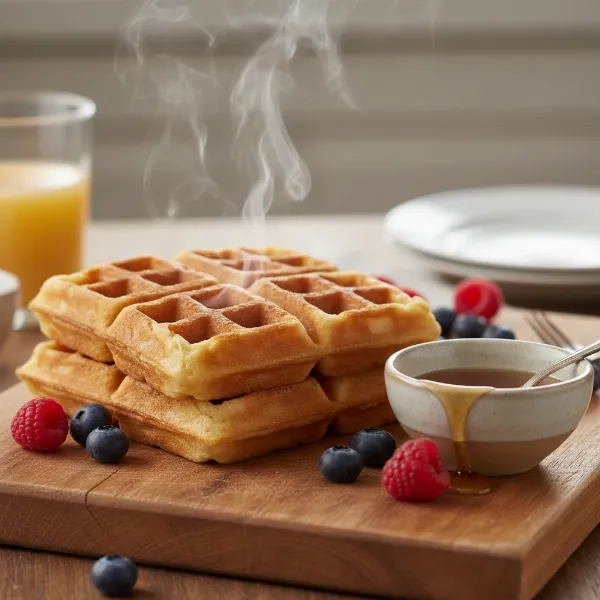 Freshly made mochi waffles, golden and crispy, stacked and ready for a delicious breakfast.
Method 2: Microwave-Prepared Dough
This method involves a preliminary step of cooking some of the ingredients in the microwave to create a more pliable mochi dough before waffling. This can lead to an even chewier internal texture.
Ingredients (Example Recipe):
- 2 cups sweet rice flour (Mochiko)
- ½ cup sugar
- 1 ¾ cups water
- 1 teaspoon vanilla extract
- ½ teaspoon salt
- ¾ cup corn starch (for dusting/shaping)
- ½ cup additional water (for adjusting consistency)
Instructions:
- Prepare Mochi Mixture: In a microwave-safe bowl, combine the sweet rice flour, sugar, 1 ¾ cups water, vanilla, and salt. Mix until smooth.
- Microwave: Heat the mixture in the microwave on high for 2 minutes. Stir, then heat for another 1-2 minutes until it becomes sticky but still wet enough to stir. If it’s too thick, add a little water at a time until it reaches a thick batter consistency.
- Form Dough: Spread the corn starch evenly in a shallow pan. Pour the microwaved mochi mixture over the corn starch and combine to form a smooth dough. The dough should be thick but pourable; add up to ½ cup more water if needed to reach a spoonable consistency.
- Preheat and Cook: Preheat and butter your waffle iron. Spoon the mochi dough into the center of the hot waffle iron, filling about half the size of the waffle for smaller, cuter moffles, or more for full-sized ones. Close the iron.
- Waffle: Cook for about 5 minutes, or until the waffle reaches your desired level of browning and crispiness.
- Cool and Serve: Remove the mochi waffle from the iron and allow it to cool slightly before serving. Cooling helps the exterior crisp up.
Method 3: Using Pre-Made Mochi
For the ultimate convenience, you can transform pre-made square mochi cakes or shabu-shabu mochi slices directly into moffles. This is a fantastic way to utilize leftover mochi.
Ingredients:
- Square mochi cakes (kiri mochi) or shabu-shabu mochi slices
- Optional: Fillings like cheese, ham, red bean paste, chocolate, or savory combinations.
Instructions:
- Preheat Waffle Iron: Heat your waffle maker until fully warm. Ensure it’s clean and lightly greased if not non-stick.
- Place Mochi: For plain moffles, place one square mochi in the center of the waffle iron. For a mochi sandwich, place two slices of shabu-shabu mochi, add your desired filling in the center (avoiding the edges), then top with another two slices of mochi.
- Close and Press: Close the waffle iron. Initially, the iron might not close completely. After about 2-3 minutes, gently press down on the lid until it fully closes and compresses the mochi.
- Cook: Continue cooking for a total of 4-6 minutes, or until the mochi waffle is golden brown and crispy.
- Remove and Serve: Carefully remove the moffle from the iron. Serve immediately while it’s hot and crispy.
Your Waffle Maker: Key to Crispy Moffles
Any standard waffle maker can be used to make mochi waffles. The key is to ensure it’s properly preheated and, if not non-stick, adequately greased to prevent sticking.
- Non-Stick Surface: A good non-stick coating is highly recommended due to the sticky nature of mochi batter.
- Preheating: Always preheat your waffle iron fully. A hot iron ensures immediate crisping of the exterior.
- Greasing: Even with a non-stick surface, a light brush of oil or cooking spray before each waffle is a good practice, especially for mochi waffles, which can be prone to sticking.
- Indicator Lights: Many waffle makers have indicator lights that signal when the iron is preheated and when the waffle is cooked. These are helpful guides, but trust your eyes for optimal browning.
Tips for Achieving the Best Mochi Waffle Texture
The hallmark of a great mochi waffle is its captivating texture. Follow these tips to ensure your moffles are perfectly crispy on the outside and wonderfully chewy within.
- Don’t Overmix: When making batter from scratch, mix only until the ingredients are just combined. Overmixing can develop gluten (if using some wheat flour, though less of an issue with pure mochiko) and lead to a tougher waffle.
- Patience with Cooking Time: Mochi waffles often require a slightly longer cooking time than traditional waffles to achieve that desirable deep golden-brown crispness. Don’t rush them; the extra time allows the exterior to develop its crust.
- Serve Immediately: Moffles are at their absolute best when fresh off the waffle iron. The exterior crispiness is most pronounced at this point. As they cool, the exterior may soften slightly, though the chewy interior remains.
- Avoid Overcrowding: Don’t put too much batter or too many mochi pieces in the iron. This can prevent proper cooking and crisping.
Creative Toppings and Serving Suggestions
Mochi waffles are versatile and can be enjoyed in countless ways, from a sweet breakfast treat to a savory snack. Their unique texture pairs well with a wide array of toppings.
Sweet Options:
- Classic Syrup & Butter: A simple drizzle of maple syrup or honey with a pat of butter.
- Powdered Sugar & Fresh Fruit: A light dusting of confectioners’ sugar alongside berries, sliced bananas, or mango.
- Japanese-Inspired: Red bean paste, matcha drizzle, kinako (roasted soybean flour), or a scoop of green tea ice cream.
- Decadent: Whipped cream, chocolate syrup, Nutella, or a spoonful of sweet condensed milk.
Savory Options:
- Cheese: Melted cheese, either plain or with a sprinkle of herbs, makes a surprisingly delicious combination.
- Ham & Cheese: A classic sandwich pairing within a mochi waffle.
- Shiso Leaf & Tuna: A unique Japanese-inspired savory filling.
- Kimchi & Cheese: For a spicy and tangy kick.
- Fried Chicken: A twist on the classic chicken and waffles, where the mochi waffle provides an interesting textural contrast.
“The magic of mochi waffles lies in their adaptability; they can effortlessly transform from a sweet indulgence to a savory delight, making them perfect for any meal or mood.” – Admin, Wafflemakerguide.com
Storing and Reheating Mochi Waffles
Mochi waffles are undoubtedly best enjoyed fresh, hot, and crispy from the waffle maker. As they cool, the crispy exterior may soften, and the mochi interior can become firmer, though still delicious within a few hours.
- Storage: If you have leftovers, allow them to cool completely before storing them in an airtight container at room temperature for up to a day, or in the refrigerator for up to 3 days.
- Reheating: To regain some of their crispness, reheat mochi waffles in a toaster, toaster oven, or conventional oven at around 350°F (175°C) for a few minutes until warmed through and crispy. Microwaving is generally not recommended as it will make them soft and potentially gummy.
Conclusion
Mochi waffles, or moffles, are a fantastic culinary adventure that combines the best of crispy waffles with the delightful chewiness of Japanese mochi. Whether you opt for a simple scratch batter, a microwave-prepared dough, or the sheer convenience of using pre-made mochi, you’re in for a treat. With their satisfying textural contrast and endless topping possibilities, moffles are sure to become a new favorite in your kitchen. So, why not embrace the crispy-chewy revolution and try making these unique waffles at home today? What creative toppings will you experiment with first to personalize your perfect mochi waffle experience?
Frequently Asked Questions
Can I make mochi waffles gluten-free?
Yes, mochi waffles are naturally gluten-free if you use 100% mochiko (sweet glutinous rice flour), as mochiko is derived from rice and contains no gluten. Always check ingredient labels for any hidden gluten if you have severe sensitivities.
What is the difference between mochiko and regular rice flour?
Mochiko is a type of glutinous (sweet) rice flour, made from short-grain glutinous rice, which gives it its characteristic sticky and chewy texture when cooked. Regular rice flour is made from non-glutinous rice and behaves more like wheat flour, resulting in a drier, crumblier texture unsuitable for mochi-like chewiness.
Why are my mochi waffles not crispy?
Lack of crispiness usually comes down to insufficient cooking time or not enough fat in the batter/on the iron. Ensure your waffle iron is fully preheated, cook the waffles until deeply golden brown, and consider adding a little more oil to the batter or greasing the iron generously.
Can I freeze mochi waffles?
While fresh is best, you can freeze cooled mochi waffles in an airtight freezer-safe bag for up to one month. Reheat them directly from frozen in a toaster or oven to restore some crispness, rather than thawing first.
What kind of waffle maker is best for mochi waffles?
Any standard electric waffle maker will work well for mochi waffles. A non-stick surface is highly beneficial, and a good quality iron that heats evenly will help achieve consistent crispiness.