Are you tired of soggy, unevenly cooked hash browns that stick to your skillet and demand constant attention? As someone who has spent over a decade perfecting the art of waffle making and waffle machine maintenance, I can tell you that your waffle maker isn’t just for sweet treats. It’s a secret weapon for breakfast perfection, especially when it comes to crafting incredibly crispy hash browns with minimal fuss. This guide will walk you through transforming humble shredded potatoes into golden, perfectly textured hash brown waffles that are crisp on the outside and tender within, simplifying your morning routine and delighting your taste buds.
The Waffle Maker Advantage: Why This Method Works Wonders
The waffle maker, a beloved kitchen appliance often relegated to weekend brunches, is surprisingly adept at creating exceptionally crispy hash browns. Unlike a traditional skillet, which requires constant flipping and careful temperature management to achieve an even crisp, a waffle iron cooks your hash browns simultaneously from both top and bottom. This dual-sided heat application ensures uniform browning and maximum crispiness across the entire surface.
Furthermore, the pressure from the closing lid of the waffle maker compresses the shredded potatoes, promoting better contact with the hot plates and helping to fuse them into a cohesive “waffle” shape. This compression also aids in expelling any remaining moisture, which is crucial for that desirable crunch. The result is a less greasy, consistently crispy hash brown that forms a beautiful, portioned waffle shape, making it easy to serve and enjoy without the struggle of breaking apart a fragile, skillet-cooked patty. This method saves time and effort, making it a stress-free alternative for a classic breakfast side.
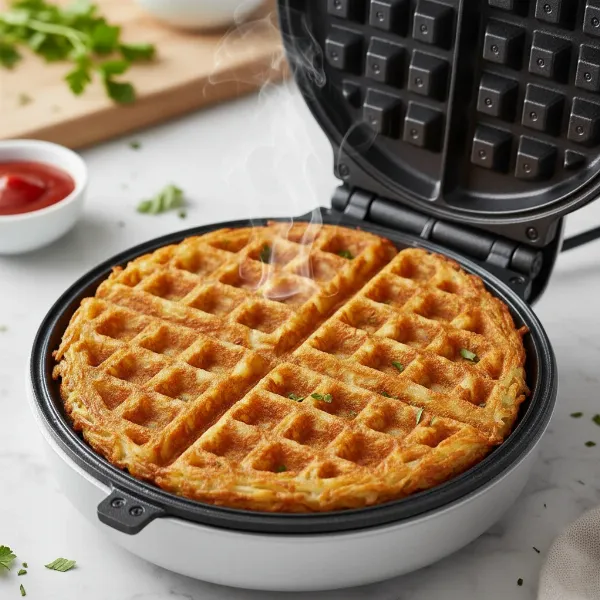 Golden, crispy hash brown waffle in a waffle maker, perfectly cooked, ready to be served.
What You’ll Need: Ingredients for Perfect Waffle Maker Hash Browns
Crafting crispy hash browns in your waffle maker requires only a few simple ingredients, with the right preparation being key to their success.
Choosing Your Potatoes
The foundation of any great hash brown is, of course, the potato. For optimal crispiness in a waffle maker, the choice of potato and its preparation are paramount.
- Fresh Potatoes: Russet potatoes are generally preferred for their high starch content, which helps them crisp up beautifully. If using fresh, you’ll need to peel and shred them yourself.
- Refrigerated Pre-shredded Hash Browns: These are an excellent, convenient option as they typically have less moisture than frozen varieties and save you the shredding step. Many seasoned cooks swear by refrigerated hash browns for their ease of use and consistent results.
- Frozen Hash Browns: While possible, frozen hash browns require extra care. They contain a significant amount of water that must be thawed and thoroughly removed to prevent a soggy outcome. If using frozen, thaw them completely first, then squeeze out as much moisture as possible.
|
Our Picks for the Best Waffle maker in 2026
As an Amazon Associate I earn from qualifying purchases.
|
||
| Num | Product | Action |
|---|---|---|
| 1 | Waffle Maker, Rotating Belgian Waffle Maker, 180° Flip Waffle Iron, Non-Stick Plate, Adjustable Browning Control, Foldable Cool Touch Handle, Removable Drip Tray, Space Saving Storage, Stainless Steel |

|
| 2 | Cuisinart Waffle Maker, 1250W Round Classic Waffle Iron, 5-Setting Adjustable Browning Control, WMR-CAP2, Brushed Stainless |
|
| 3 | bella Classic Rotating Belgian Waffle Maker with Nonstick Plates, Removable Drip Tray, Adjustable Browning Control and Cool Touch Handles, Black |
|
| 4 | Elite Gourmet EWM015MX Electric Nonstick 4.5-inch Mini Waffle Maker, Belgian Waffles, Compact Design, Hash Browns, Keto, Snacks, Sandwich, Eggs, Easy to Clean, Mint |
|
| 5 | Cuisinart Waffle Maker, 1250W Round Classic Waffle Iron, 5-Setting Adjustable Browning Control, WMR-CANAS, Brushed Stainless |
|
| 6 | Dash No-Drip Waffle Maker - Quad Waffle Maker for Hassle-Free Breakfasts - Dual Nonstick Heating Plates & Quick Heat-Up System - Easy-Release Surface - Silver |
|
| 7 | KRUPS 4-Slice Belgian Waffle Maker: Stainless Steel, 5 Browning Levels, Audible Ready Beep, Removable Plates, 1200W, Silver/Black, Large Waffle Maker Family Size, Great for Family Breakfasts |
|
| 8 | Cuisinart Round Flip Belgian Waffle Maker, Black/Silver, 1 inch thick, WAF-F30NAS |
|
| 9 | Dash Mini Waffle Maker- Compact Electric Iron for Creative Homemade Treats - Nonstick Surface - Easy-to-Clean - Perfect for Kids & Families - Aqua |
|
| 10 | OSTBA Waffle Maker, 2 Slice Non-Stick Waffle Iron, Belgian Waffle Machine with Indicator Lights, PFOA Free, Perfect for Breakfast and Snacks, 750W |
|
Regardless of your choice, the most critical step is removing excess moisture. Potatoes that are too wet will steam instead of crisp, resulting in a limp, unappetizing hash brown.
Essential Seasonings and Fats
A little seasoning and the right fat are all it takes to elevate your hash browns.
- Fat: Melted butter, olive oil, or a good cooking spray are essential. Butter adds a rich flavor and promotes browning, while oil provides a neutral crispness. You’ll use this to grease your waffle iron and lightly coat your potatoes.
- Seasoning:
- Salt and Black Pepper: These are non-negotiable for enhancing flavor.
- Onion Flakes or Finely Diced Onion: Adds a classic hash brown aroma and taste.
- Garlic Powder or Paprika: Optional additions for an extra layer of flavor and a touch of color.
Keep it simple to let the potato flavor shine, or experiment with your favorite spices.
Step-by-Step Guide: How to Make Crispy Hash Browns in Your Waffle Maker
Making crispy hash browns in a waffle maker is a straightforward process. Follow these steps for golden-brown perfection every time.
- Preheat Your Waffle Maker: Plug in your waffle maker and set it to medium-high or high heat. Allow it to fully preheat until the indicator light signals it’s ready. A properly hot waffle iron is crucial for immediate crisping and preventing sticking.
- Prepare Your Potatoes:
- For Fresh Potatoes: Peel and shred your russet potatoes using a box grater or food processor. Place the shredded potatoes in a bowl of cold water, swirl them around to rinse off excess starch, then drain thoroughly. The absolute most important step is to squeeze out as much moisture as possible. Lay the shredded potatoes on a clean kitchen towel or several layers of paper towels, wrap them up, and twist tightly to extract every bit of liquid. The drier the potatoes, the crispier your hash browns will be.
- For Refrigerated Hash Browns: No rinsing or shredding is needed. Simply ensure they are as dry as possible if they appear moist.
- For Frozen Hash Browns: Thaw them completely, then drain and vigorously squeeze out all excess water using a towel.
- Season Your Potatoes: Transfer the dried, shredded potatoes to a bowl. Drizzle with a tablespoon or two of olive oil or melted butter, then season generously with salt, black pepper, and any optional seasonings like dried onion flakes or paprika. Toss with a fork to ensure the potatoes are evenly coated.
- Grease the Waffle Iron: Once heated, lightly brush or spray both the top and bottom plates of your waffle maker with melted butter or cooking oil. Be generous, as this not only prevents sticking but also contributes to the crispiness.
- Load the Waffle Maker: Place an even mound of seasoned potatoes in the center of the waffle iron. Slightly over-stuffing is acceptable, as the potatoes will compress. Avoid spreading them too thin, but also don’t pile them so high that the lid cannot close.
- Cook for Ultimate Crispiness: Gently close the waffle maker lid, pressing down lightly at first. You may notice some steam escaping, which is normal. After about 2 minutes, close the lid completely and press down firmly to compress the potatoes, ensuring maximum contact with the cooking plates. Continue cooking for approximately 10 to 20 minutes, depending on your waffle maker’s temperature and your desired level of crispiness. Begin checking at the 10-minute mark; they are ready when golden brown and crispy all over.
- Remove and Serve: Carefully open the waffle maker and use tongs or a silicone spatula to remove your perfectly crispy hash brown waffle. Serve immediately while hot.
Expert Tips for Extra Crispy Results
Achieving consistently crispy waffle maker hash browns is easy with a few expert insights. These tips, honed over years of working with waffle machines, will ensure your hash browns reach their full potential.
The “Squeeze Dry” Secret
This cannot be overstated: remove as much moisture as possible from your shredded potatoes. Excess water is the enemy of crispiness. Whether you’re using fresh, refrigerated, or thawed frozen potatoes, wringing them out thoroughly in a clean kitchen towel or multiple layers of paper towels is the single most important step. The drier your potatoes are before they hit the hot iron, the crunchier they will become.
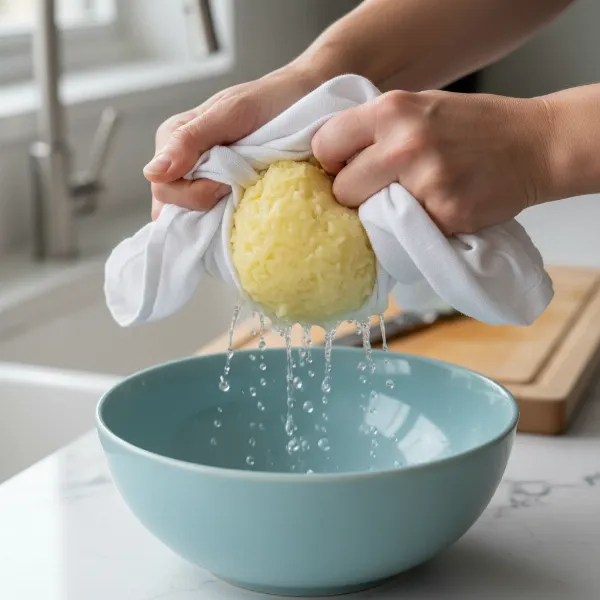 Hands squeezing excess water from shredded potatoes wrapped in a clean kitchen towel.
Temperature Matters
Always preheat your waffle maker to a medium-high or high setting. Placing potatoes onto a cold or insufficiently heated iron will result in steaming rather than searing, leading to a softer, less crispy texture. A scorching hot surface immediately begins the caramelization process, creating that desirable golden crust. Don’t rush the preheating phase; wait for the indicator light to confirm your iron is ready.
Don’t Peek Too Soon
It can be tempting to lift the lid and check on your hash browns frequently, but patience is a virtue here. Opening the waffle maker too early releases accumulated heat and steam, interrupting the cooking process and potentially leading to a less crispy result. Resist the urge to peek for at least 5-7 minutes, especially during the initial cooking phase. Let the heat and pressure work their magic.
Don’t Crowd the Iron
While it’s good to fill the waffle grid for a cohesive hash brown, avoid overstuffing the iron excessively. Too many potatoes can lower the temperature of the plates, extend cooking time, and prevent even browning. Aim for a generous but manageable amount that allows the lid to close relatively flat, ensuring consistent pressure and heat distribution.
Beyond the Basics: Flavor Variations and Serving Suggestions
Once you’ve mastered the basic crispy waffle maker hash brown, the possibilities for customization are endless. Get creative with flavor variations and serving ideas.
Flavorful Add-ins
Transform your hash browns by incorporating extra ingredients into the potato mixture before cooking:
- Aromatics: Finely diced onions, shallots, or garlic for a deeper savory base.
- Vegetables: Diced bell peppers, jalapeños for a kick, or even shredded zucchini (ensure extra moisture is squeezed out).
- Cheese: Shredded cheddar, mozzarella, or a blend of your favorite cheeses mixed in or sprinkled on top halfway through cooking for a gooey center.
- Meat: Cooked and crumbled bacon, diced ham, or sausage bits for a hearty addition.
Creative Seasoning Blends
Beyond salt and pepper, experiment with different spice blends:
- Smoked Paprika: Adds a smoky depth and vibrant color.
- Cajun or Old Bay Seasoning: For a zesty, flavorful kick.
- Italian Herbs: A mix of oregano, basil, and thyme for an aromatic twist.
- Everything Bagel Seasoning: Sprinkle it on top before closing the lid for a unique texture and flavor.
Serving Suggestions
Crispy hash brown waffles are incredibly versatile and pair well with almost any breakfast or brunch item.
- Classic Breakfast: Serve alongside fried or scrambled eggs, crispy bacon, or savory sausage.
- Toppings Galore: Drizzle with ketchup, hot sauce, a dollop of sour cream or Greek yogurt, a sprinkle of fresh chives, or even a fried egg right on top.
- Waffle Sandwiches: Use two hash brown waffles as the “bread” for a unique breakfast sandwich with egg, cheese, and your favorite protein.
“The waffle maker’s unique ability to apply even pressure and heat simultaneously is a game-changer for hash browns. It’s like having a dedicated crisping machine that delivers perfect texture every time, hands-free.” – Sarah Jenkins, Culinary Innovator & Waffle Tech Enthusiast
Conclusion
Making perfectly crispy hash browns in a waffle maker is a simple yet revolutionary kitchen hack that transforms your breakfast experience. By embracing the dual-sided cooking power and gentle compression of your waffle iron, you can achieve consistently golden, crunchy hash browns with a tender interior, all while saving time and effort. Remember the golden rules: thoroughly dry your potatoes, preheat your iron, and be patient for that ideal crisp. This method not only delivers superior texture but also makes cleanup a breeze, proving that your waffle maker is a versatile tool for so much more than just waffles. So, dust off your waffle iron and prepare to elevate your hash brown game. What new breakfast creations will you unlock with this fantastic technique?
Frequently Asked Questions
Can I use frozen shredded hash browns directly in the waffle maker?
It’s strongly recommended to thaw frozen shredded hash browns completely and then squeeze out as much excess moisture as possible before cooking them in a waffle maker. Cooking them directly from frozen will release too much water, preventing them from crisping up properly and likely resulting in a soggy texture.
How long does it take to cook hash browns in a waffle maker?
Cooking time typically ranges from 10 to 20 minutes, depending on your specific waffle maker model, its heat setting, and your desired level of crispiness. Start checking after about 10 minutes and continue cooking until they are golden brown and firm to the touch.
Do I need to add oil or butter to the hash browns or the waffle maker?
Yes, it’s essential to grease both the top and bottom plates of your waffle maker generously with melted butter or cooking oil to prevent sticking and aid in browning and crispiness. Additionally, tossing the shredded potatoes with a small amount of oil or melted butter before cooking helps ensure an even crisp.