There’s nothing quite like a freshly made, golden-brown waffle – crispy on the outside, fluffy on the inside. But what happens when you have leftovers, or you’re making a big batch ahead of time? The challenge is keeping them from becoming soggy or rubbery when it’s time for round two. Learning how to properly reheat waffles is a game-changer, ensuring every bite is as delightful as the first. This guide will walk you through the best methods to bring your waffles back to life, keeping them perfectly crispy and fresh, whether they’re from yesterday’s breakfast or a batch you’ve frozen for later.
Understanding Why Waffles Lose Their Crispness
Waffles are a delicate balance of moisture and texture. When they first come off the waffle iron, the heat quickly evaporates surface moisture, creating that coveted crispy exterior. As waffles cool, moisture from the interior migrates to the surface, causing them to soften and lose their initial crispness. Additionally, exposure to air can lead to staleness. The key to successful reheating lies in effectively reversing this process – rapidly heating the waffle to re-evaporate surface moisture, while warming the interior without drying it out or making it tough. Different reheating methods achieve this with varying degrees of success, depending on the appliance and how quickly it can apply heat.
The Best Methods for Reheating Waffles
Achieving that ideal crispness requires the right approach. Forget the microwave for anything more than a quick warm-up; for true crispness, you need dry heat. Here are the most effective methods, each with its own advantages.
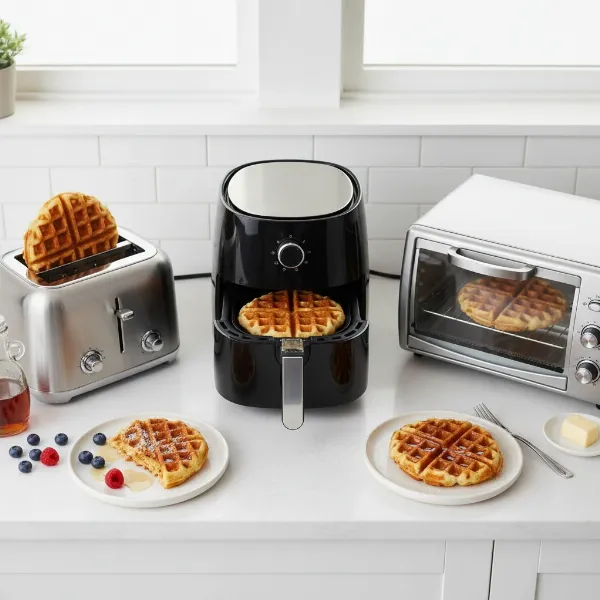 Various kitchen appliances for reheating waffles to achieve perfect crisp texture.
Reheating Waffles in a Toaster or Toaster Oven
For individual waffles or small batches, a toaster or toaster oven is arguably the quickest and most effective way to restore crispness. The direct, radiant heat works similarly to how the waffle iron originally crisped the exterior.
- How to do it: Place one or two waffles directly into the toaster slots or on the rack of a toaster oven. Use a medium setting.
- Time: 1-3 minutes in a toaster; 2-5 minutes in a toaster oven, flipping halfway through for even browning.
- Best for: Fresh or frozen waffles, single servings, achieving maximum crispness quickly.
- Pro Tip: For frozen waffles, use a slightly longer or higher setting. You don’t need to thaw them first.
|
Our Picks for the Best Waffle maker in 2026
As an Amazon Associate I earn from qualifying purchases.
|
||
| Num | Product | Action |
|---|---|---|
| 1 | bella Classic Rotating Belgian Waffle Maker with Nonstick Plates, Removable Drip Tray, Adjustable Browning Control and Cool Touch Handles, Black |

|
| 2 | Cuisinart Waffle Maker, 1250W Round Classic Waffle Iron, 5-Setting Adjustable Browning Control, WMR-CANAS, Brushed Stainless |
|
| 3 | OSTBA Waffle Maker, 2 Slice Non-Stick Waffle Iron, Belgian Waffle Machine with Indicator Lights, PFOA Free, Perfect for Breakfast and Snacks, 750W |
|
| 4 | Dash No-Drip Waffle Maker - Quad Waffle Maker for Hassle-Free Breakfasts - Dual Nonstick Heating Plates & Quick Heat-Up System - Easy-Release Surface - Silver |
|
| 5 | Dash Mini Waffle Maker- Compact Electric Iron for Creative Homemade Treats - Nonstick Surface - Easy-to-Clean - Perfect for Kids & Families - Aqua |
|
| 6 | KRUPS 4-Slice Belgian Waffle Maker: Stainless Steel, 5 Browning Levels, Audible Ready Beep, Removable Plates, 1200W, Silver/Black, Large Waffle Maker Family Size, Great for Family Breakfasts |
|
| 7 | Waffle Maker, Rotating Belgian Waffle Maker, 180° Flip Waffle Iron, Non-Stick Plate, Adjustable Browning Control, Foldable Cool Touch Handle, Removable Drip Tray, Space Saving Storage, Stainless Steel |
|
| 8 | Cuisinart Waffle Maker, 1250W Round Classic Waffle Iron, 5-Setting Adjustable Browning Control, WMR-CAP2, Brushed Stainless |
|
| 9 | Elite Gourmet EWM015MX Electric Nonstick 4.5-inch Mini Waffle Maker, Belgian Waffles, Compact Design, Hash Browns, Keto, Snacks, Sandwich, Eggs, Easy to Clean, Mint |
|
| 10 | Cuisinart Round Flip Belgian Waffle Maker, Black/Silver, 1 inch thick, WAF-F30NAS |
|
Using an Air Fryer for Crispy Waffles
The air fryer has become a favorite for reheating because of its ability to circulate hot air evenly, creating an incredibly crispy texture with minimal effort. It’s like a convection oven in miniature, ideal for waffles.
- How to do it: Preheat your air fryer to 350°F (175°C). Place waffles in a single layer in the air fryer basket, ensuring they are not overlapping.
- Time: 2-4 minutes for fresh waffles; 4-6 minutes for frozen waffles. Check at the halfway point and flip if necessary.
- Best for: Achieving superior crispness, handling small to medium batches, both fresh and frozen waffles.
- Pro Tip: A light spritz of water on slightly stale waffles before air frying can help refresh them without making them soggy.
The Oven Method for Multiple Waffles
When you have a larger quantity of waffles to reheat, the conventional oven is your best friend. It allows for even heating of multiple waffles at once, making it perfect for family breakfasts or brunch gatherings.
- How to do it: Preheat your oven to 350°F (175°C). Place a wire rack on a baking sheet. Arrange waffles in a single layer on the wire rack.
- Time: 5-10 minutes for fresh waffles; 10-15 minutes for frozen waffles. The wire rack ensures air circulation all around, promoting even crisping.
- Best for: Large batches, ensuring every waffle is heated through and crispy.
- Pro Tip: Don’t skip the wire rack; it’s crucial for preventing a soggy bottom. For extra crispiness, try bumping up the temperature to 375°F (190°C) for the last minute or two, watching carefully to prevent burning.
Skillet/Pan Frying for a Quick Crisp
If you’re looking for a quick and easy method that adds a slight richness, pan frying in a skillet can work wonders. This method is especially good for waffles that are already a bit dry and need a boost of moisture and crisp.
- How to do it: Heat a non-stick skillet over medium heat. You can add a tiny bit of butter or cooking spray for extra flavor and crispness. Place waffles in the hot skillet.
- Time: 1-2 minutes per side, until golden brown and crispy.
- Best for: Individual waffles, adding a buttery flavor, when you don’t want to turn on a larger appliance.
- Pro Tip: Don’t overcrowd the pan, and resist the urge to press down on the waffles, which can make them dense.
The Microwave: When to Use (and When Not To)
The microwave is generally not recommended if crispiness is your goal. It heats by exciting water molecules, which often results in steamed, soft, and rubbery waffles.
- When to use it: If you absolutely need a warm waffle immediately and don’t care about crispness, or if you plan to follow up with another method (like a toaster) for crisping.
- How to do it: Place a waffle on a microwave-safe plate. Heat for 10-20 seconds.
- Time: Very short bursts, just enough to warm.
- Best for: Speed, not for quality.
- Avoid if: Crispness is a priority.
Pro Tips for Perfectly Reheated Waffles
Beyond the method, a few key practices can elevate your reheating game from good to gourmet.
Starting with the Right Waffle
The type of waffle you’re reheating matters. Thicker, denser waffles (like Belgian waffles) tend to reheat better than very thin, delicate ones. Waffles made with a good amount of butter and eggs often crisp up beautifully. Always ensure your original waffles are fully cooked through, as undercooked waffles can become gummy when reheated.
Proper Storage is Key
The way you store your leftover waffles profoundly impacts their reheating potential.
- For short-term (1-2 days): Let waffles cool completely on a wire rack to prevent condensation, then store them in an airtight container at room temperature.
- For longer storage (up to 3 months): Flash-freeze cooled waffles on a baking sheet until solid (about 1-2 hours). This prevents them from sticking together. Once frozen, transfer them to a freezer-safe bag, removing as much air as possible.
- Avoid: Storing warm waffles directly in a container, as this traps steam and leads to sogginess.
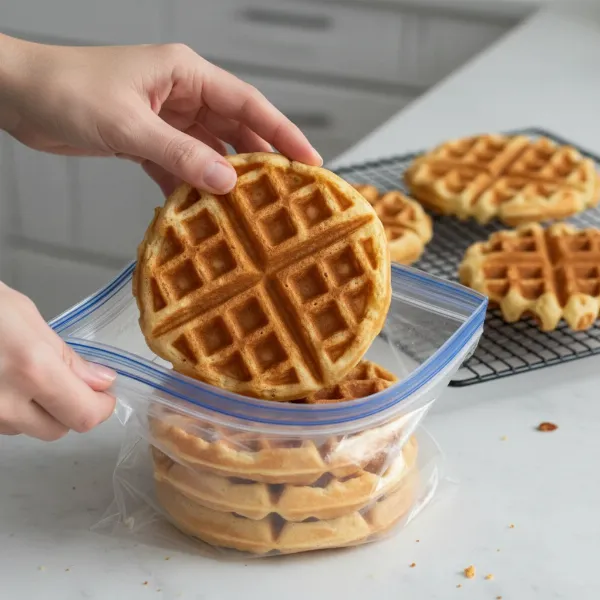 Stack of cooled waffles being stored in a freezer-safe bag for freshness.
Don’t Overcrowd Your Appliance
Whether using an air fryer, oven, or skillet, give your waffles space. Overcrowding inhibits air circulation, leading to uneven heating and a less crispy result. Work in batches if necessary. Patience here will be rewarded with superior texture.
The “Double-Crisp” Trick
For truly exceptional results, especially with slightly older or previously frozen waffles, consider a two-step reheating process. First, quickly microwave the waffle for 10-15 seconds to warm it through from the inside. Immediately follow up by crisping it in a toaster, air fryer, or hot skillet for 1-2 minutes. This internal warmth speeds up the crisping process without drying out the exterior.
Common Mistakes to Avoid When Reheating Waffles
Even with the best intentions, some pitfalls can turn your reheating efforts into a soggy or burnt disaster.
- Using the microwave exclusively: As discussed, this is the enemy of crispness. Only use it as a preliminary warming step.
- Not preheating your appliance: Dropping waffles into a cold oven or air fryer means they spend too much time warming up, rather than crisping, leading to a softer texture.
- Overcooking: While you want crispness, overcooking will dry out the waffle, making it tough and brittle. Keep a close eye on them.
- Not cooling waffles completely before storing: This is a major cause of sogginess, as trapped steam turns to water droplets, making the waffles damp before they even go into storage.
- Stacking waffles while they’re hot: Always allow them to cool on a wire rack individually before stacking or storing to maintain their initial crispness.
Conclusion
Reheating waffles doesn’t have to be a culinary compromise. With the right techniques and a little attention to detail, you can enjoy delicious, crispy, and fresh-tasting waffles long after they’ve been made. From the quick convenience of a toaster to the superior crisping power of an air fryer or oven, choosing the best method for your needs ensures every leftover waffle is a treat, not a disappointment. So go ahead, make that extra batch – your future self will thank you. What’s your go-to method for waffle reheating, and have you discovered any other secret tips for maintaining that perfect crunch?
Frequently Asked Questions
Can you reheat waffles in a regular toaster?
Yes, reheating waffles in a regular toaster is one of the most effective ways to restore their crispness, especially for individual servings. Place the waffle in the toaster slots on a medium setting for 1-3 minutes until it’s heated through and crispy. This method is quick and yields excellent results, similar to how bread is toasted.
How do you make leftover waffles crispy again?
To make leftover waffles crispy again, avoid the microwave and opt for dry heat methods like a toaster, toaster oven, air fryer, or conventional oven. These appliances quickly re-evaporate surface moisture, giving you that desired crunch without drying out the interior. Always preheat your chosen appliance for best results.
How long do you reheat waffles in an air fryer?
To reheat waffles in an air fryer, preheat it to 350°F (175°C). Place fresh waffles in a single layer in the basket for 2-4 minutes, or frozen waffles for 4-6 minutes. This method circulates hot air evenly, providing exceptional crispness and a perfectly warmed interior.
Is it better to reheat waffles in the oven or microwave?
It is significantly better to reheat waffles in the oven (or a toaster/air fryer) if you want them to be crispy. The oven uses dry heat, which re-crisps the exterior. The microwave, conversely, uses moisture-based heating, resulting in soft, often rubbery waffles, and should generally be avoided for crispness.
How do you store waffles so they stay fresh for reheating?
To store waffles for fresh reheating, first allow them to cool completely on a wire rack to prevent condensation. For short-term (1-2 days), store in an airtight container at room temperature. For longer storage (up to 3 months), flash-freeze them on a baking sheet before transferring to a freezer-safe bag to prevent sticking.