There’s an undeniable joy that comes with a fresh, perfectly golden waffle – a canvas for your favorite toppings, from syrup to fresh fruit. But for many home cooks, this delight is often followed by the looming dread of cleaning the waffle maker, especially when burnt sugar and stubborn batter cling to the grids. As someone who’s spent over a decade knee-deep in waffle maker mechanics and culinary tips, I can assure you that dealing with these sticky situations is not just possible, but surprisingly straightforward with the right approach. This guide will walk you through proven, safe, and effective methods to restore your waffle maker to its pristine condition, ensuring every future waffle is a masterpiece.
Understanding the Challenge: Why Waffles Stick and Burn
Waffles, with their intricate grid patterns, are prone to collecting batter drips and sugar residue. High cooking temperatures, especially when making recipes with higher sugar content or when the iron isn’t adequately prepped, can quickly caramelize sugars and bake batter onto the non-stick surface. While non-stick coatings are designed to prevent this, continuous use, minor scratches, or improper preparation can lead to frustrating stickiness and unsightly burns. Knowing the enemy is the first step to conquering it and keeping your waffle maker performing at its best.
 Close-up of waffle maker grids with burnt sugar and stuck batter
Essential Preparations Before You Clean
Before you even think about tackling that burnt-on mess, safety and preparation are paramount.
- Safety First: Unplug and Cool Completely: This cannot be stressed enough. Always ensure your waffle maker is unplugged and has completely cooled down before attempting any cleaning. A hot appliance poses burn risks, and an plugged-in one carries the danger of electrical shock.
- Consult Your Manual: Every waffle maker is unique. Your appliance’s user manual is your best friend, offering specific care instructions, details on whether plates are removable, and if certain cleaning agents are safe for its particular non-stick coating.
- Gather Your Tools: Having the right arsenal makes the job much easier. You’ll need:
- Soft cloths or microfiber towels
- Paper towels
- A soft-bristled brush (like a pastry brush or an old, soft toothbrush)
- Baking soda
- A small amount of cooking oil (vegetable or canola)
- A non-abrasive scraper (silicone spatula, wooden utensil, or even an old credit card)
- Toothpicks or cotton swabs for tight crevices
Step-by-Step Guide: Removing Burnt Sugar and Stuck Batter
With your tools ready and safety precautions in mind, let’s dive into the most effective methods for banishing those stubborn residues.
1. The Initial Wipe-Down: Tackling Loose Debris
|
Our Picks for the Best Waffle maker in 2026
As an Amazon Associate I earn from qualifying purchases.
|
||
| Num | Product | Action |
|---|---|---|
| 1 | Cuisinart Waffle Maker, 1250W Round Classic Waffle Iron, 5-Setting Adjustable Browning Control, WMR-CANAS, Brushed Stainless |

|
| 2 | OSTBA Waffle Maker, 2 Slice Non-Stick Waffle Iron, Belgian Waffle Machine with Indicator Lights, PFOA Free, Perfect for Breakfast and Snacks, 750W |
|
| 3 | Dash Mini Waffle Maker- Compact Electric Iron for Creative Homemade Treats - Nonstick Surface - Easy-to-Clean - Perfect for Kids & Families - Aqua |
|
| 4 | Cuisinart Waffle Maker, 1250W Round Classic Waffle Iron, 5-Setting Adjustable Browning Control, WMR-CAP2, Brushed Stainless |
|
| 5 | Dash No-Drip Waffle Maker - Quad Waffle Maker for Hassle-Free Breakfasts - Dual Nonstick Heating Plates & Quick Heat-Up System - Easy-Release Surface - Silver |
|
| 6 | Elite Gourmet EWM015MX Electric Nonstick 4.5-inch Mini Waffle Maker, Belgian Waffles, Compact Design, Hash Browns, Keto, Snacks, Sandwich, Eggs, Easy to Clean, Mint |
|
| 7 | Cuisinart Round Flip Belgian Waffle Maker, Black/Silver, 1 inch thick, WAF-F30NAS |
|
| 8 | Waffle Maker, Rotating Belgian Waffle Maker, 180° Flip Waffle Iron, Non-Stick Plate, Adjustable Browning Control, Foldable Cool Touch Handle, Removable Drip Tray, Space Saving Storage, Stainless Steel |
|
| 9 | KRUPS 4-Slice Belgian Waffle Maker: Stainless Steel, 5 Browning Levels, Audible Ready Beep, Removable Plates, 1200W, Silver/Black, Large Waffle Maker Family Size, Great for Family Breakfasts |
|
| 10 | bella Classic Rotating Belgian Waffle Maker with Nonstick Plates, Removable Drip Tray, Adjustable Browning Control and Cool Touch Handles, Black |
|
Once your waffle maker is completely cool, begin by addressing any loose crumbs or dry batter fragments. Use a dry paper towel or a soft cloth to gently wipe down the grids and the exterior of the appliance. A soft pastry brush can be incredibly effective for sweeping crumbs out of the deeper grooves without scratching the surface. This step prevents small bits from becoming soggy and harder to remove during wet cleaning.
2. The Damp Cloth Method: For Fresh Batter Residue
For lighter, recently dried batter or slight stickiness, a simple damp cloth can often do the trick. Dip a soft cloth or sponge into warm water, wring it out thoroughly to ensure it’s not dripping wet, and gently wipe the waffle plates. If your manual permits, a few drops of mild dish soap can be added to the water for extra cleaning power. Remember to wipe again with a clean, damp cloth to remove any soap residue, then dry completely.
3. The Power of Baking Soda Paste: Your Go-To for Stubborn Stains
When facing stubborn, baked-on batter or caramelized sugar, a baking soda paste is your secret weapon. This natural abrasive and deodorizer works wonders without harming your non-stick coating.
How to Make the Paste
In a small bowl, combine baking soda with just enough lukewarm water to create a thick, spreadable paste. For an even deeper clean, especially if there’s significant greasy residue, some experts recommend adding a few drops of hydrogen peroxide to the baking soda (it may bubble slightly).
Application and Soaking
Using a paper towel, a soft-bristled brush, or your fingers, spread the baking soda paste evenly over the burnt sugar and stuck batter on the waffle grids. Ensure it gets into all the nooks and crannies. Let the paste sit and work its magic for at least 30 minutes, or up to an hour for very tough stains. As it absorbs oils and breaks down residue, you might notice the paste changing color to yellow or brown.
Gentle Removal
After the soaking period, take a clean, damp cloth and gently wipe away the dried paste and loosened residue. For any stubborn bits still clinging to the grooves, toothpicks or cotton swabs can be invaluable for careful removal. Once all the paste and grime are gone, wipe the grids thoroughly with a clean, damp cloth to remove any baking soda residue, then dry completely with a clean towel.
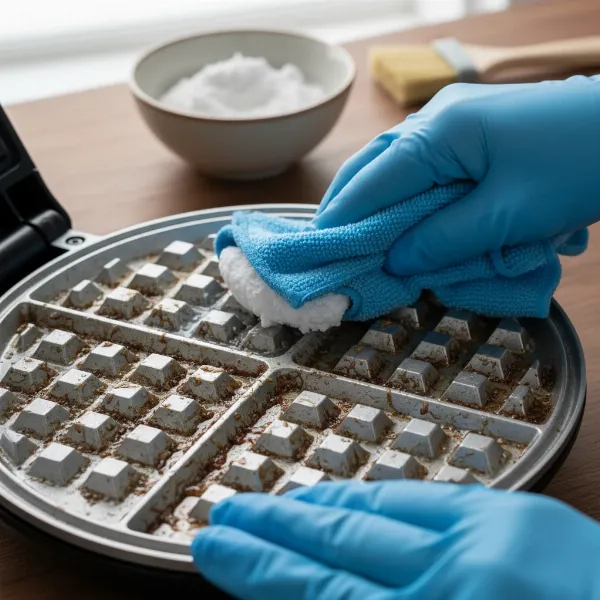 Hands gently cleaning waffle maker grids with a baking soda paste
4. The Cooking Oil Trick: Softening Stubborn Batter
For batter that has hardened and stuck firmly to the grids, cooking oil can act as a gentle solvent. Drizzle a few drops of a neutral cooking oil (like vegetable or canola) directly onto the baked-on batter. Allow it to sit for a few minutes to penetrate and soften the caked-on food. Then, using a paper towel or a soft, damp cloth, gently rub and wipe away the softened batter. This method is particularly effective for breaking down greasy, baked-on spills.
5. Steaming Away the Stickiness: The Hot Cloth Method
Sometimes, a little steam is all it takes to loosen things up. After your waffle maker has completely cooled and been unplugged, place a hot, very damp (but not dripping) cloth or several layers of paper towels directly over the grids. Close the lid and let it sit for 5-10 minutes. The warmth and moisture will create steam inside, helping to rehydrate and soften the burnt sugar and batter, making them easier to wipe away with a clean cloth.
6. Carefully Handling Melted Sugar (For Non-Removable Plates)
If you’ve cooked with pearl sugar or a very sugary batter that has aggressively caramelized and pooled in the grids of a waffle maker with non-removable plates, an extreme caution method involves hot water. Only attempt this if you are absolutely certain the appliance is unplugged and fully cooled. Carefully pour a small amount of hot water directly onto the burnt sugar. The hot water will help melt the sugar, allowing you to then absorb it with paper towels. You may need to repeat this process several times, ensuring you dry the unit thoroughly between applications and before storing. This method requires a very steady hand and a deep understanding of your appliance’s limits to avoid electrical component exposure to water.
7. Tools for the Tough Spots: Non-Abrasive Scrapers
For those incredibly stubborn, stuck-on pieces that resist softer methods, you might need a bit of gentle scraping. Crucially, never use metal tools, steel wool, or anything abrasive that can scratch and damage your non-stick coating. Instead, opt for soft, non-abrasive tools such as:
- Silicone Spatulas: Their flexible edges can conform to the grids.
- Wooden Utensils: Great for prying up larger pieces.
- Old Credit Cards: The plastic edge can be surprisingly effective for scraping without damage.
- Toothpicks or Cotton Swabs: Ideal for reaching into the narrow crevices and removing tiny bits of residue.
Apply gentle pressure and work patiently to lift the burnt residue without digging into the surface.
Preventing Future Messes: Tips for a Cleaner Waffle Maker
An ounce of prevention is worth a pound of cure, especially when it comes to waffle makers. Following these simple steps can significantly reduce future cleaning headaches:
- Proper Oiling: Instead of relying on aerosol cooking sprays, which can cause a sticky, polymerized buildup over time that is extremely difficult to remove, opt for lightly brushing the grids with a neutral cooking oil. A small amount of oil applied with a pastry brush or paper towel creates an effective non-stick barrier.
- Don’t Overfill: This is a common culprit for messy overflows. Learn the optimal amount of batter for your specific waffle maker. A good rule of thumb is to fill the grids about two-thirds full, allowing room for the batter to expand.
- Clean After Every Use: The easiest time to clean a waffle maker is right after it cools down. Fresh spills and soft batter are far simpler to remove than hardened, baked-on messes. Make it a habit to give your waffle maker a quick wipe-down immediately after use.
Common Mistakes to Avoid When Cleaning
To protect your waffle maker and ensure its longevity, steer clear of these common cleaning blunders:
- Using Abrasive Tools: Metal scrapers, steel wool, or abrasive pads will irrevocably damage the non-stick coating, leading to more sticking in the future.
- Submerging the Waffle Maker: Unless your waffle maker has removable, dishwasher-safe plates, never submerge the main electrical unit in water. This can damage internal components and create an electrical hazard.
- Cleaning While Hot or Plugged In: As mentioned, this is a safety hazard and can melt cleaning tools.
- Ignoring the User Manual: Your manual has specific guidance for your appliance. Deviating from it can void warranties or cause damage.
- Using Harsh Chemicals: Stick to mild solutions like baking soda paste or diluted dish soap. Harsh chemical cleaners can degrade non-stick surfaces or leave harmful residues.
Quote from an expert:
“Many people overlook the user manual, but it’s truly the first and best resource for understanding how to properly care for your specific waffle maker, especially regarding removable plates and safe cleaning agents. Don’t guess; consult the guide.” – [Your Name/Title], Waffle Maker Expert
Conclusion
Cleaning a waffle maker, even one with stubborn burnt sugar and batter, doesn’t have to be a daunting task. By embracing simple yet effective methods like the baking soda paste, careful oil application, and prompt post-use cleaning, you can maintain your appliance in top condition. Remember to always prioritize safety by unplugging and cooling your unit, and protect its non-stick surface by avoiding abrasive tools and harsh chemicals. With these tips in your arsenal, you’re ready to enjoy perfectly cooked waffles every time, without the lingering worry of a messy cleanup. What delicious waffle creation will you whip up first with your sparkling clean machine?
Frequently Asked Questions
Can I use steel wool to clean my waffle maker?
No, absolutely not. Steel wool and other abrasive scrubbers will scratch and permanently damage the non-stick coating of your waffle maker, leading to waffles that stick even more in the future. Always opt for soft cloths, silicone tools, or baking soda paste for safe cleaning.
How often should I clean my waffle maker?
Ideally, you should clean your waffle maker after every use. A quick wipe-down immediately after it cools prevents batter and sugar from hardening, making deep cleaning less frequent and easier. For occasional users, a thorough clean before storing is recommended.
What if my waffle maker has removable plates?
If your Waffle Maker features removable plates, consider yourself lucky! After unplugging and cooling, simply detach the plates. Most removable plates can be washed by hand in warm, soapy water. Always check your user manual to see if they are also dishwasher-safe, as this varies by model and brand.
Why does my waffle maker get sticky residue even with non-stick spray?
Paradoxically, many aerosol cooking sprays contain ingredients that, when heated repeatedly, can polymerize and create a sticky, brownish residue on non-stick surfaces. It’s often better to brush a small amount of liquid cooking oil onto the grids before each use to prevent sticking without the unwanted buildup.
Can I deep clean my waffle maker with hydrogen peroxide?
Yes, hydrogen peroxide can be combined with baking soda to create a powerful paste for deep cleaning and tackling very sticky or oily residues. Mix 1/4 cup of baking soda with 1/2 teaspoon of hydrogen peroxide, apply to the grids, let it sit for an hour, then wipe clean with a damp cloth. Remember to always unplug and cool the appliance first.