There’s nothing quite like the aroma of freshly made waffles filling your kitchen, but a wobbly or loose handle on your waffle iron can quickly turn that joy into frustration and even a safety hazard. A stable handle is crucial for safe operation, allowing you to easily open, close, and maneuver your appliance without fear of spills or burns. This comprehensive guide will equip you with the knowledge and steps to diagnose and repair a loose waffle iron handle, ensuring your breakfast routine remains smooth and enjoyable.
Why Your Waffle Iron Handle Gets Loose: Common Causes
Understanding the root cause of a loose handle is the first step toward a successful repair. Over time, several factors can contribute to this common issue, affecting both traditional cast iron and modern electric waffle makers.
- Regular Wear and Tear: Frequent use naturally loosens components. The constant opening and closing, combined with the pressure applied during cooking, can cause screws to back out or other fastening mechanisms to weaken.
- Thermal Expansion and Contraction: Waffle irons experience significant temperature fluctuations. The repeated heating and cooling of metal and plastic parts can lead to materials expanding and contracting, which may gradually loosen connections, especially those secured by screws.
- Stripped Screws or Fittings: If a handle is secured by screws, the screw threads in the handle or the appliance body can become stripped. This prevents the screw from tightening properly, leaving the handle perpetually loose.
- Plastic Fatigue or Damage: Many modern waffle irons use plastic components in their handles or fastening systems. Over time, or due to accidental drops and impacts, these plastic parts can crack, chip, or deform, compromising the handle’s stability.
Safety First: Before You Begin Your Waffle Iron Repair
Before you pick up any tools, prioritizing safety is paramount. Working with electrical appliances requires caution to prevent injuries and further damage.
- Unplug Your Waffle Iron: Always ensure the appliance is completely disconnected from the power source. This eliminates any risk of electric shock.
- Allow it to Cool Completely: Waffle irons get very hot. Give your appliance ample time to cool down before handling it to prevent burns. A minimum of 30 minutes to an hour is usually sufficient after use.
- Work in a Well-Lit Area: Good lighting will help you clearly see small screws, hidden fasteners, and any potential damage, making the repair process easier and safer.
- Gather Necessary Tools: Having all your tools within reach before you start will streamline the repair and prevent you from having to search for items mid-task.
Essential Tools for Waffle Iron Handle Repair
The tools required for fixing a loose waffle iron handle are typically common household items. Depending on your waffle iron’s design and the nature of the looseness, you might need a combination of the following:
- Screwdrivers: A set including Phillips-head and flathead screwdrivers of various sizes is often essential.
- Small Prying Tool or Putty Knife: Useful for gently dislodging trim pieces or covers that hide fasteners.
- Penetrating Oil: If screws are rusted or seized, a penetrating oil can help loosen them.
- Small Shims: Materials like matchstick slivers, thin wood toothpicks, or even a piece of paper match (head removed) can be used to fill stripped screw holes.
- Thread Locker or Instant Glue: A small drop of thread locker can secure screws against vibration and thermal cycling, preventing them from loosening again. Instant glue can also be used carefully.
- Heat-Resistant Epoxy or JB Weld: Ideal for handles that fit into a socket or have components that need to be permanently bonded due to cracks or stripped non-screw connections.
- Pliers or Small Wrench: May be needed for certain types of nuts or bolts, though less common for simple handle tightening.
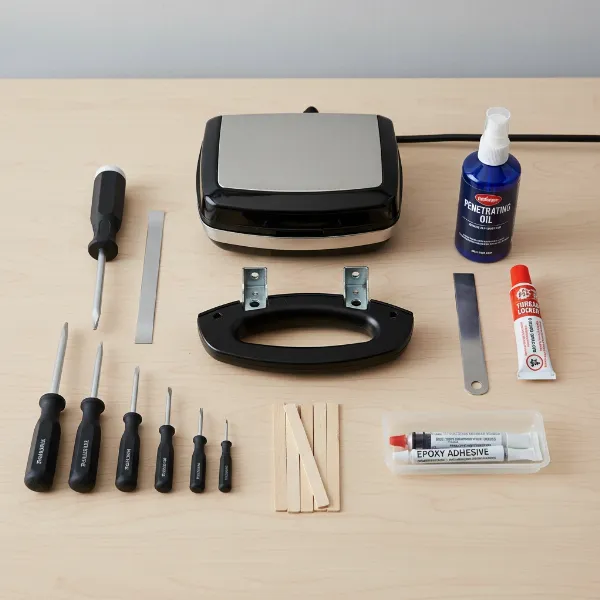 Assortment of tools for repairing a waffle iron handle, including screwdrivers, prying tool, and epoxy.
Step-by-Step Guide: Fixing Your Loose Waffle Iron Handle
The repair process varies depending on how your specific waffle iron’s handle is attached. Here’s a general approach covering the most common scenarios.
Step 1: Inspect Your Waffle Iron’s Handle Attachment
Begin by thoroughly examining the handle and the area where it connects to the waffle iron.
- Visible Screws: Are there any screws directly visible on the handle or the mounting plate? These are the easiest to address.
- Hidden Fasteners: Sometimes, screws are concealed beneath decorative trim pieces, caps, or even accessed from the underside of the appliance.
- Inserted Handles: Some handles, particularly on older or cast iron models, might be secured by a peg that fits into a socket, often relying on friction or a threaded connection inside.
- Rivet-Style Fasteners: Less common for repair by tightening, but some handles are permanently attached with rivets. If a rivet is loose, it might indicate a more complex repair or replacement is needed.
|
Our Picks for the Best Waffle maker in 2026
As an Amazon Associate I earn from qualifying purchases.
|
||
| Num | Product | Action |
|---|---|---|
| 1 | Cuisinart Waffle Maker, 1250W Round Classic Waffle Iron, 5-Setting Adjustable Browning Control, WMR-CAP2, Brushed Stainless |

|
| 2 | bella Classic Rotating Belgian Waffle Maker with Nonstick Plates, Removable Drip Tray, Adjustable Browning Control and Cool Touch Handles, Black |
|
| 3 | Dash Mini Waffle Maker- Compact Electric Iron for Creative Homemade Treats - Nonstick Surface - Easy-to-Clean - Perfect for Kids & Families - Aqua |
|
| 4 | Cuisinart Round Flip Belgian Waffle Maker, Black/Silver, 1 inch thick, WAF-F30NAS |
|
| 5 | Dash No-Drip Waffle Maker - Quad Waffle Maker for Hassle-Free Breakfasts - Dual Nonstick Heating Plates & Quick Heat-Up System - Easy-Release Surface - Silver |
|
| 6 | OSTBA Waffle Maker, 2 Slice Non-Stick Waffle Iron, Belgian Waffle Machine with Indicator Lights, PFOA Free, Perfect for Breakfast and Snacks, 750W |
|
| 7 | KRUPS 4-Slice Belgian Waffle Maker: Stainless Steel, 5 Browning Levels, Audible Ready Beep, Removable Plates, 1200W, Silver/Black, Large Waffle Maker Family Size, Great for Family Breakfasts |
|
| 8 | Elite Gourmet EWM015MX Electric Nonstick 4.5-inch Mini Waffle Maker, Belgian Waffles, Compact Design, Hash Browns, Keto, Snacks, Sandwich, Eggs, Easy to Clean, Mint |
|
| 9 | Waffle Maker, Rotating Belgian Waffle Maker, 180° Flip Waffle Iron, Non-Stick Plate, Adjustable Browning Control, Foldable Cool Touch Handle, Removable Drip Tray, Space Saving Storage, Stainless Steel |
|
| 10 | Cuisinart Waffle Maker, 1250W Round Classic Waffle Iron, 5-Setting Adjustable Browning Control, WMR-CANAS, Brushed Stainless |
|
Step 2: Accessing Hidden Fasteners (If Applicable)
If your handle’s fasteners aren’t immediately visible, you’ll need to carefully expose them.
- Removing Trim Pieces: For many modern electric waffle makers, plastic or metal trim pieces often cover the handle screws. Use a thin putty knife or a small flathead screwdriver to gently pry these pieces away. Look for small tabs or clips holding them in place, often near hinges or seams. Apply even pressure to avoid cracking the plastic. Once the trim is removed, you should see the screws securing the handle.
- Accessing from Underside: In some designs, especially if the handle is part of the lid assembly, screws might be accessible by removing the bottom plate of the waffle iron. This usually involves unscrewing several screws on the base of the unit. Proceed with caution and observe how internal components are arranged if you choose this method.
Step 3: Tightening Screws or Securing Loose Fittings
Once the fasteners are accessible, you can proceed with the repair.
- Simple Tightening: If the screws are simply loose, use the appropriate screwdriver to tighten them firmly. Do not overtighten, as this can strip the threads or crack plastic components.
- Addressing Stripped Screw Holes: If a screw turns indefinitely without tightening, the hole is likely stripped. Remove the screw. Take a small shim (a sliver of a wooden matchstick, toothpick, or a piece of paper match with the head cut off) and insert it into the screw hole. The shim will provide new material for the screw threads to grip. Reinsert and tighten the screw. For a more robust fix, you could apply a tiny drop of wood glue to the shim before inserting it, letting it dry, then re-screwing.
- Using Thread Locker: For screws that repeatedly loosen, a small drop of non-permanent thread locker (like Loctite Blue) can be applied to the screw threads before re-tightening. This creates friction that resists loosening from vibration and temperature changes. Be sure to use a type that allows for future disassembly if needed.
- Dealing with Stuck Screws: If a screw is corroded or stuck, apply a small amount of penetrating oil to the screw head and threads. Allow it to soak for 15-30 minutes, then try to loosen the screw slowly. If it’s still stuck, try tapping the screwdriver handle gently while applying turning pressure to help break the bond.
 Hand using a screwdriver to tighten a loose screw on a waffle iron handle for repair.
Step 4: Re-Securing Inserted Handles with Epoxy
For handles that are not screw-secured but rather insert into a socket and have become loose, heat-resistant epoxy is often the best solution.
- Clean Surfaces: Thoroughly clean both the handle’s peg and the socket with rubbing alcohol to remove any grease or debris. Allow it to dry completely.
- Apply Epoxy: Mix a small amount of high-quality, heat-resistant epoxy (such as JB Weld) according to the manufacturer’s instructions. Apply a thin, even coat around the handle’s peg and inside the socket.
- Insert and Cure: Firmly insert the handle into the socket, ensuring it is properly aligned. Hold it in place or use clamps if necessary until the epoxy begins to set. Allow the epoxy to cure fully for the time recommended by the manufacturer, often 24 hours, before using the waffle iron. This ensures a strong, lasting bond.
Step 5: Reassemble and Test
Once the repair is complete and any adhesives have cured, it’s time to put everything back together.
- Reassemble Components: Replace any trim pieces or bottom plates you removed, ensuring all screws are tightened.
- Test for Stability: Gently wiggle the handle to check its stability. It should feel firm and secure, with no excessive play.
- Final Check: Do a quick visual inspection to ensure no parts are left over and everything looks correctly seated.
Pro Tips for Waffle Iron Handle Longevity
Preventing future handle looseness is easier than repeated repairs. Adopt these habits to keep your waffle iron in top condition:
- Gentle Handling: Avoid slamming the lid shut or yanking the handle. Operate your waffle iron with care to minimize stress on its components.
- Regular Checks: Periodically inspect your handle’s fasteners. A quick tighten every few months can prevent significant looseness from developing.
- Avoid Excessive Force: If the lid is sticking, investigate the cause rather than forcing the handle. Excess force can strip screws or break plastic parts.
“A well-maintained waffle iron handle isn’t just about convenience; it’s a critical safety feature that ensures confident and comfortable use every time you crave golden, crispy waffles.” – Chef Antoine Dubois, Culinary Equipment Specialist
Conclusion
A loose handle on your waffle iron doesn’t have to mean the end of your beloved appliance. With a little patience and the right tools, you can often fix the issue yourself, extending the life of your Waffle Maker and saving money on replacements. By understanding the common causes, prioritizing safety, and following these step-by-step instructions, you can restore your waffle iron’s handle to perfect stability. Enjoying delicious homemade waffles should be a pleasure, not a precarious balancing act. What kind of waffles will you make first with your newly repaired iron?
Frequently Asked Questions
Why does my waffle iron handle keep getting loose after I tighten it?
If your waffle iron handle repeatedly loosens after tightening, the screw threads might be stripped, preventing a secure grip. Alternatively, repeated thermal expansion and contraction can cause screws to back out. Consider using a small shim in the screw hole or applying a dab of thread locker to the screw threads for a more permanent solution.
Can I use super glue to fix a loose waffle iron handle?
While super glue (instant glue) can offer a temporary fix for some loose parts, it’s generally not recommended for high-stress or high-heat areas like a waffle iron handle. For a durable repair, especially where heat is involved, a specialized heat-resistant epoxy or thread locker is a much more reliable and safer choice.
My waffle iron handle is cracked, can I still fix it?
If your waffle iron handle is cracked, especially if it’s a plastic component, a simple tightening might not be sufficient. Small cracks can sometimes be reinforced with heat-resistant epoxy. However, if the crack is extensive or compromises the handle’s structural integrity, it might be safer to look for a replacement handle part from the manufacturer or consider replacing the entire waffle iron to avoid potential hazards.
How do I know if my waffle iron handle is screwed in or simply inserted?
You can usually tell by carefully inspecting the handle’s base. Look for visible screw heads, either on the top, bottom, or sides of where the handle meets the main body of the waffle iron. If no screws are visible, the handle might be designed to insert into a socket, often secured by internal clips, friction, or adhesive, in which case you might see a seam or connection point.