Ever bite into a waffle so perfectly crisp on the outside, yet light and fluffy on the inside, that you just had to close your eyes and savor the moment? Chances are, that masterpiece wasn’t born from a modern, plug-in appliance. Welcome, friend, to the world of the old-school champion of waffle-making. So, What Is A Cast Iron Waffle Maker? It’s more than just a kitchen tool; it’s a ticket to a bygone era of cooking, a culinary heirloom that creates waffles with a texture and flavor that modern machines struggle to replicate. Let’s dive into the sizzling, savory world of cast iron and discover why this classic piece of cookware deserves a spot on your stove.
The Lowdown: What Exactly is a Cast Iron Waffle Maker?
A cast iron waffle maker, often called a “waffle iron,” is a non-electric, two-sided hinged press made entirely of cast iron. Unlike its modern electric cousins you plug into the wall, this traditional tool is designed to be used directly on a heat source like a gas stovetop, an electric coil, or even over a campfire. Think of it as the grandparent of the modern waffle maker—it’s heavier, requires a bit more hands-on attention, but the results? Absolutely legendary. My perfect weekend morning starts with the satisfying thunk of my cast iron waffle maker hitting the gas burner.
These irons typically come in two main styles: a long-handled version that looks a bit like a futuristic tennis racket, and a base-and-press model where the waffle plate assembly sits in a cradle that allows it to be easily flipped. The basic principle is simple: you preheat both sides of the iron, pour in your batter, close it, and flip it halfway through cooking to ensure both sides are a deep, beautiful golden brown.
Why Go Old-School? The Sizzling Benefits of Cast Iron
You might be wondering, “In an age of smart appliances, why bother with something so… manual?” Ah, that’s where the magic lies. Using a cast iron waffle maker isn’t just about making breakfast; it’s about the craft.
- Unbeatable Texture: Cast iron is a king when it comes to heat retention and distribution. Once it’s hot, it stays hot. This intense, even heat sears the outside of the batter instantly, creating an incredibly crisp, sturdy crust that you just can’t achieve with the often-uneven heating of thinner, non-stick aluminum plates. The inside steams perfectly, resulting in a tender, airy interior.
- Built to Last a Lifetime (or Three): This isn’t a throwaway appliance. A well-cared-for cast iron waffle maker can be passed down through generations. There are no finicky electronics to fail or non-stick coatings to scratch and peel. It’s a true kitchen heirloom.
- A Naturally Non-Stick Surface: Forget Teflon. With proper seasoning (we’ll get to that), cast iron develops a beautiful, slick patina that releases waffles with ease. Plus, you’re not worrying about synthetic coatings.
- Versatility: Heading out for a camping trip? You can’t exactly pack your electric Belgian waffle maker. But a cast iron model? It works beautifully over an open fire or on a camp stove. It’s the adventurer’s choice for a gourmet breakfast in the great outdoors.
According to kitchen equipment expert Chef Isabella Rossi, “The secret to a truly transcendent waffle is the violent, even heat that cast iron provides. It flash-cooks the exterior, locking in moisture for that perfect textural contrast. It’s a difference you can both taste and feel.”
The Other Side of the Griddle: Potential Drawbacks
Of course, it’s not all sunshine and syrup. To give you the full picture, let’s be honest about the challenges. A cast iron waffle maker requires a bit of a commitment.
- The Learning Curve: There’s no “ready” light or browning control dial. You have to learn the feel of your stove, listen for the sizzle, and peek to check for doneness. Your first few waffles might be… experimental. But the payoff is worth the practice!
- It’s Heavy: Cast iron is dense. These waffle makers are hefty, which can make them a bit cumbersome to handle and store.
- Seasoning is Non-Negotiable: You can’t just unbox it and go. It needs to be properly seasoned before first use and maintained over time to keep its non-stick properties and prevent rust.
|
Our Picks for the Best Waffle Maker in 2025
As an Amazon Associate, we earn from qualifying purchases.
|
||
| Num | Product | Action |
|---|---|---|
| 1 | MasterChef Bubble Waffle Maker- Electric Non stick Hong Kong Egg Waffler Iron Griddle w FREE Recipe Guide- Ready in under 5 Minutes |

|
| 2 | CROWNFUL Mini Waffle Maker, 4\" Chaffle Maker with Compact Design, Easy to Clean, Non-Stick Surface, Recipe Guide Included, Perfect for Breakfast, Dessert, Sandwich, or Other Snacks |
|
| 3 | BELLA 17175 Bubble Maker w, Rapid Quickly Make Fluffy 9” Authentic Hong Kong Breakfast or Dessert, Healthy-Eco Non Stick Coating, Easy to Clean Waffle Iron, 120 Volts, Cone Rack Included, White |
|
| 4 | Ninja BW1001 NeverStick PRO Belgian Waffle Maker, Vertical Design, 5 Shade Settings, with Precision-Pour Cup & Chef-curated Recipe Guide, Black & Silver |
|
| 5 | CROWNFUL Mini Waffle Maker, 4\" Chaffle Maker with Compact Design, Easy to Clean, Non-Stick Surface, Recipe Guide Included, Perfect for Breakfast, Dessert, Sandwich, or Other Snacks |
|
| 6 | DASH Multimaker Mini System - Waffle Maker with Six 4” Removable Plates: Waffle Iron & Griddle, 4-in-1 Mini Waffle Maker for Kids and Families – Nonstick Surface, Just Add Batter (Aqua) |
|
| 7 | DASH Mini Waffle Maker - 4” Waffle Mold, Nonstick Waffle Iron with Quick Heat-Up, Nonstick Surface - Perfect Mini Waffle Maker for Kids and Families, Just Add Batter (Red) |
|
| 8 | Bubble Waffle Maker- Electric Non stick Hong Kong Egg Waffler Iron Griddle w/Ready Indicator Light- Ready in under 5 Mins- Recipe Guide Included, Make Delicious Ice Cream Cones for Xmas Gift or Treat |
|
| 9 | Car Mini Waffle Maker- Xmas Gift for Him- Make 7 Different Race Cars Trucks & Automobile Vehicle Shaped Pancakes for Kids Adults- Electric Waffler Iron w Recipe Guide, NonStick Pan Cake Baker Machine |
|
| 10 | Chefman Rotating Belgian Waffle Maker, 180° Flip Iron w/ Non-Stick Plates, Adjustable Timer, Locking Lid, & Drip Plate, Space Saving Storage, Mess-Free Breakfast, Stainless Steel/Black |
|
How to Season Your Cast Iron Waffle Maker
Seasoning is the process of baking oil onto cast iron, which creates a hard, non-stick surface through a process called polymerization. It sounds scientific, but it’s pretty simple.
- Wash and Dry Thoroughly: If it’s new, wash it with a little bit of mild soap and water to remove any factory coating. This is the only time you should use soap. Dry it completely—even a drop of water can lead to rust. Popping it on a low burner for a few minutes works great.
- Apply a Thin Coat of Oil: Use a neutral oil with a high smoke point, like canola, grapeseed, or even flaxseed oil. Use a paper towel to rub a very, very thin layer over every single surface of the iron, inside and out.
- Wipe it Off: Grab a clean paper towel and wipe the oil off. Seriously. You want it to look like there’s no oil left. Trust me, there’s a microscopic layer that’s perfect for seasoning.
- Bake It: Place the waffle maker in your oven, preheated to around 450-500°F (230-260°C), for about an hour. It’s wise to put a baking sheet on the rack below to catch any potential drips.
- Cool Down: Turn the oven off and let the iron cool down completely inside the oven. Voila! It should have a nice, dark, semi-glossy finish.
How Do You Use a Cast Iron Waffle Maker?
Ready to make some magic? Here’s a quick-start guide to using your newly seasoned iron.
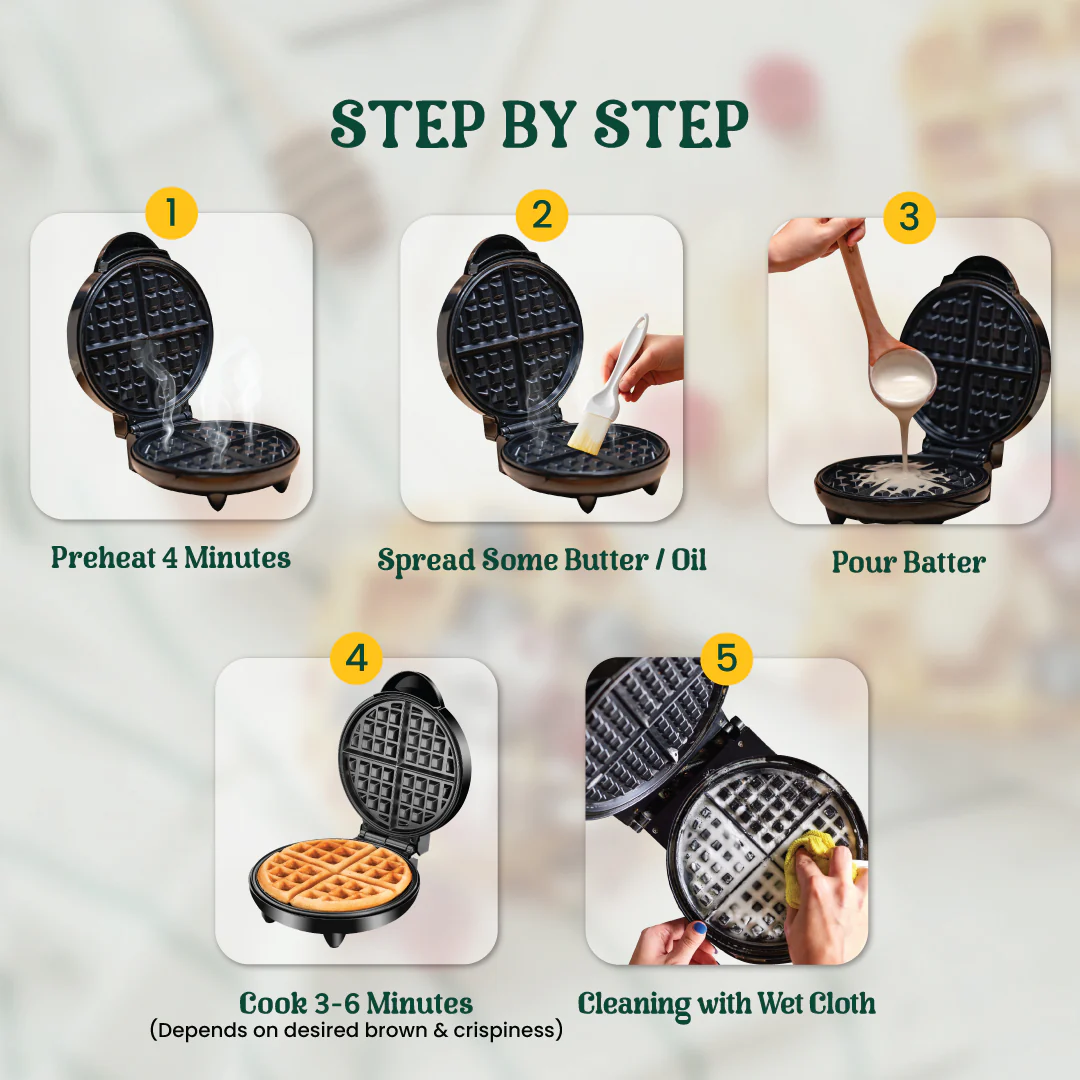
- Preheat Like You Mean It: Place the closed waffle maker on your stovetop over medium heat. Let it preheat for about 5-10 minutes, flipping it halfway through to heat both sides evenly. A good way to test if it’s ready is to flick a drop of water on it; if it sizzles and evaporates instantly, you’re good to go.
- Grease It Up: Open the iron and brush both sides with melted butter or a neutral oil. This ensures that first waffle doesn’t stick.
- Pour the Batter: Pour your favorite classic waffle batter onto the bottom plate. Don’t overfill! A little less is better than a huge mess.
- Close and Flip: Close the iron and immediately flip it over. This allows the batter to flow into the top grid, creating a full waffle.
- Cook and Listen: Cook for about 2-4 minutes per side. The time will vary based on your stove and batter. A good indicator is when the steaming starts to slow down. You can always take a quick peek.
- Remove and Repeat: Use a fork or wooden skewer to gently lift the waffle out. Keep it warm in a low oven while you make the rest of the batch.
Cast Iron vs. Modern Electric Waffle Makers
| Feature | Cast Iron Waffle Maker | Modern Electric Waffle Maker |
|---|---|---|
| Heat Source | Stovetop, Campfire, Grill | Wall Outlet |
| Texture | Superior Crispiness, Fluffy Interior | Good, but often softer |
| Convenience | Manual, requires practice | Very easy, often has indicator lights |
| Durability | Heirloom quality, lasts forever | Varies, electronics can fail |
| Cleaning | No soap, simple wipe & re-oil | Often has removable, dishwasher-safe plates |
| Special Features | None | Browning control, drip tray, audible alerts |
How to Clean a Cast Iron Waffle Maker
Cleaning a cast iron waffle maker is easier than you think, but it has one golden rule: no soap and no dishwasher.
The simplest answer is to wipe it clean while it’s still warm with a paper towel or a soft brush to remove crumbs. For any stuck-on bits, you can use a bit of coarse salt and a touch of oil to create a scouring paste, then wipe it clean. After cleaning, place it back on the warm burner for a minute to ensure it’s bone dry, and apply a micro-layer of cooking oil before storing. This protects the seasoning you worked so hard to build.
Frequently Asked Questions (FAQ)
Q: Can I use a cast iron waffle maker on an induction cooktop?
A: Yes! Because cast iron is a ferrous metal, it works perfectly on induction stovetops. It’s actually a great combination, as induction offers very precise temperature control.
Q: My waffles are sticking! What did I do wrong?
A: Sticking is almost always due to one of two things: insufficient seasoning or the iron not being hot enough when you poured the batter. Try re-seasoning your iron and make sure you preheat it thoroughly before your next batch.
Q: How do I know when to flip the waffle maker?
A: The best practice is to flip it immediately after closing it. This helps the batter spread evenly into the top grid. Cook for a few minutes, then flip it back to finish the first side.
Q: Can you use pancake mix in a cast iron waffle maker?
A: You can, but it won’t be great. Waffle batter is different from pancake mix; it contains more fat (like butter or oil) and sugar, which is crucial for creating that crispy, caramelized exterior. Using pancake mix will likely result in a soft, flimsy waffle that’s prone to sticking.
Q: Is a vintage cast iron waffle maker better than a new one?
A: Not necessarily, but many people cherish vintage pieces (like from brands such as Griswold or Wagner) for their smoother casting surfaces and historical value. A new, quality-made cast iron waffle maker will perform just as well once it’s well-seasoned.
The Final Word on Cast Iron Waffles
Owning and using a cast iron waffle maker is an experience. It’s a hands-on process that connects you to your food in a way that pushing a button on a machine never can. It’s for the breakfast traditionalist, the campfire cook, and the culinary enthusiast who believes that the best things in life are worth a little extra effort. The reward is a waffle that’s not just food, but an achievement—a perfectly golden, impossibly crisp, and utterly delicious piece of breakfast history.
Ready to take the plunge? Check out our reviews of the best stovetop waffle makers of 2024 to find the perfect iron to start your own tradition.